
Deploying Production Grade Pivotal Cloud Foundry’s Pivotal Application Service PAS
By Bikram Singh / Jul 02,2018
Overview
Pivotal Cloud Foundry (PCF) is a platform agnostic cloud computing platform that provides an on-demand and scalable solution to continuously deliver any app to every major private and public cloud with a single platform.Pivotal Cloud Foundry is a single platform to deploy Pivotal Application Service(formerly Elastic Runtime), Pivotal Container Service and Pivotal Function Service(Not yet GA).

Ref: pivotal.io
This blog focuses on Pivotal Application Service which is a PaaS platform .This article will provide steps for deploying production grade PCF Pivotal Application Service on a VMware vSphere 6.5 environment.This article focuses on deployment and configuration, if you are new to Pivotal Cloud Foundry I highly recommend you go through the PCF documentation to understand how it works and its architecture. I will not be covering any concepts or architecture in this blog. Refer below for PCF overview and architecture
PCF Overview and Concepts
Refrence Architecture
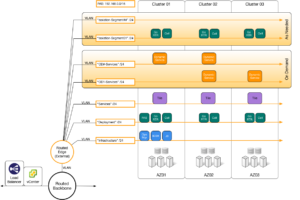
Pivotal Recommedended Architecture
* Atleast 10 routable IPs
     3 x Gorouters
     3 x Diego Brain
     2 x MySQL Proxy
     1 x HA Proxy
     1 x Ops Manager
* VMware vSphere 6.5 Cluster with Datastore on shared storage
* NTP Server
* 2 x Wildcard DNS record
    *.system.itp-inc.com
    *.app.itp-inc.com
* DNS A record for PCF Ops Manager
* PCF Ops Manager OVA for vSphere - pcf-vsphere-2.1-build.335.ova
  [Download Ops Manager](https://network.pivotal.io/products/ops-manager)
* PAS - cf-2.1.7-build.4.pivotal
  [Download PAS](https://network.pivotal.io/products/elastic-runtime)
* 2 x /24 Network subnets for PCF-INFRA and PCF-PAS
VMware vSphere Requirements
The following are the minimum resource requirements for maintaining a Pivotal Cloud Foundry (PCF) deployment with Ops Manager and Pivotal Application Service (PAS) on vSphere:
* vSphere 6.5, 6.0, or 5.5
* Disk space: 2TB recommended
* Memory: 120GB
* Two public IP addresses: One for PAS and one for Ops Manager
* vCPU cores: 80
* Overall CPU: 28 GHz
* vSphere editions: standard and above
* Ops Manager must have HTTPS access to vCenter and ESX hosts on TCP port 443.
* A configured vSphere cluster
Ref: docs.pivotal.io
Cluster Components
* VMware vSphere 6.5 environment with vSAN for shared storage
* vsanDatastore to store Ephemeral and Persistent disks
* VMware Distributed vSwitch
* PCF Ops Manager 2.1.7 - 2.1-build.335
* PCF PAS 2.1.7 - cf-2.1.7-build.4
PCF Virtual Machines
To achieve HA PCF will deploy total 42 VMs mentioned below
3 x Consul
2 x NATS
1 x File storage
2 x MySQL Proxy
3 x My SQL Server
1 x Backup Prepare Node
3 x Diego BBS
2 x UAA
2 x Cloud Controller
1 x HA Proxy
3 x Gorouters
1 x Clock Global
2 x Cloud Controller Worker
3 x Diego Cell
3 x Diego Brain
3 x Loggregator Trafficcontroller
3 x Syslog Adapter
2 x Syslog Scheduler
2 x Doppler Server
Deploy PCF Operations Manager on vSphere vCenter
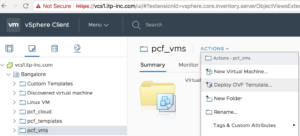
1. Login to vCenter Web client and create below folders
VM and Template Folder - pcf_vms
VM and Template Folder - pcf_templates
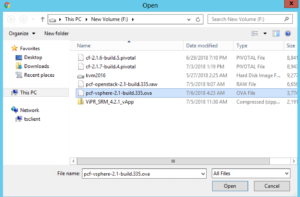
Storage Folder - pcf_disk2. Select the pcf_vms folder to highlight it, and then click Actions > Deploy OVF Template.
3. In the Select Screen, choose Local file and browse to Pivotal Cloud Foundry Ops Manager for vSphere.ova file that you downloaded and click Next.

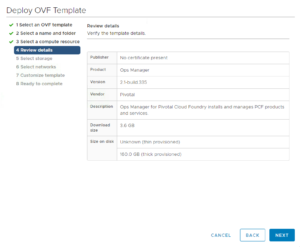
4. In the Review Details page, review the details page and click Next.
5. On the Select Storage screen, select the vsanDatastore and click Next.

6. In the Networks page, select PCF_INFRA network which created on VDS and click Next.

7. In the Cutomize Template page, provide the following details:
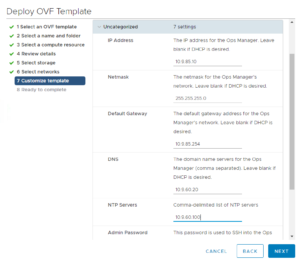
- IP Address: 10.9.85.10
- Netmask: 255.255.255.0
- Gateway: 10.9.85.254
- DNS: 10.9.60.20
- NTP: 10.9.60.100
- Admin Password: <password>
- Confirm Password: <password>
- Custom Hostname: Leave to default or provide a custom name
8. In the Ready to complete screen, review information and click Finish.


Login to Ops Manager and configure BOSH Director for vSphere
1. Browse FQDN of Ops Manager – https://opsmanager.system.itp-inc.com
2. First time when you start Ops Manager, select Internal Authentication, PCF will maintain user database locally.
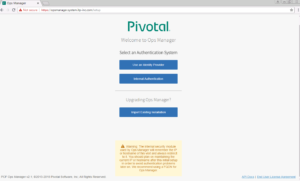
3. Fill the username and password.Enter a Decryption passphrase and the Decryption passphrase confirmation.If you are using an Http or Https proxy please fill in the details.

4. Login to Ops Manager with credentials created in previous step

5. In the Installation Dashboard screen, click VMware vSphere tile
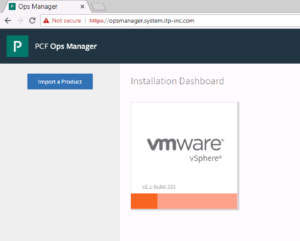
6. On the Settings tab,click vCenter Config and configure as per below
a. vCenter Host: Hostname or IP of the vCenter.
b. vCenter Username: vCenter username with create and delete privileges for virtual machines (VMs) and folders.
c. vCenter Password: Password for the vCenter username.
d. Datacenter Name: Datacenter name from vCenter.
e. Virtual Disk Type: Virtual Disk Type (Thin/Thick).
f. Ephemeral Datastore Names (comma delimited): Datastores to store ephemeral VM disks
g. Persistent Datastore Names (comma delimited): Datastores to store persistent VM disks
h. Select Standard vCenter Networking
i. VM Folder Name: defaults to pcf_vms. Bosh director will place VMs in this folder
j. Template Folder: Defaults to pcf_templates. Bosh director will place VM Templates in this folder
k. Disk path Folder: defaults to pcf_disk. Bosh director will place VM disks in this folder


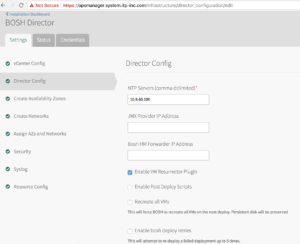
7. In Director Config configure below:
a. In the NTP Servers (comma delimited): NTP server addresses.
b. Select VM Ressurector Plugin.
c. Credhub Encryption, Blobstore Location, Database Location set to Internal.
d. Leave all other options to default.


8. In Create Availability Zones configure below.
a. Click Add and configure below
b. Name for the Availability Zone.
b. Type the Name of vCenter Cluster to use as an Availability Zone.
You can add more Availability cluster by repeating above steps, Pivotal recommends 3.

9. In Create Networks configure below
a. Select Enable ICMP checks to enable ICMP on network
b. Click Add Network
c. Type a Name for the network
d. Type vSphere Network Name, it should match the portgroup name in vCenter
e. Type the CIDR of portgroup
f. Type IP addresses that you want BOSH director to exclude while assigning to VMs
g. Type DNS and Gateway IP
h. Select the Availability Zones we added above


12. In Assign AZs and Networks select a Singleton Availability Zone and Network.

13. In Security leave all to default settings.

14. In Syslog we selected No. if you are using external syslog, Please enter details.

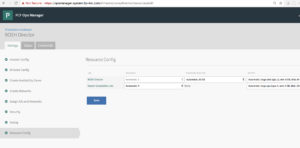
15. In Resource Config leave all to default settings.
16. Click Installation Dashboard to go back to the Dashboard and click Apply Changes to start the BOSH
Director installation.
It will take some time to install BOSH director and you can check logs if installation fails

Installing and configuring Pivotal Application Service for vSphere
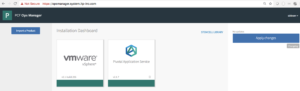
1. Adding Pivotal Application Service tile to Ops Manager
a. In Ops Manager, click Import a Product and select the Pivotal
Application Service .pivotal file (cf-2.1.7-build.4.pivotal). Once
the file is uploaded click on “+” to add as a tile.
2. Click on PAS and then select Settings and select Assign AZs and Networks.
a. Select AZ for Singleton and Balance jobs
b. Select the Network for PAS VMs(PCF-PAS).

3. Select Domains and enter domain names for system and app
System : system.itp-inc.com , Apps : app.itp-inc.com. You also need to
create wilcard DNS entries for these domains

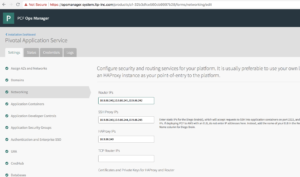
4. Select Networking
a. Add the three IPs that we reserved for the GoRouters in the Router
IPs input box. The three IPs we reserved for Diego Brains in the SSH Proxy IPs input box,
1 IP for HAProxy and TCP Router
leave blank as we are not enabling TCP routing.
b. Click Generate RSA Certificate, type system and app domain names and generate self signed cert
c. We selected Disable SSL certificate verification since we are using self signed certs
d. Leave the rest of the fields blank or defaults
5. Select Application Containers and Leave all the fields to defaults
- Select Application Developer Controls and leave all the fields to
defaults - Select Application Security Groups and acknowledge
- Select Authentication and Enterprise SSO and set the password
policies as per your need. We left them to defaults - Select UAA and select Internal MySQL for high availability(you
can also use external MYSQL) and then generate cert under SAML Service
Provider Credentials for domain .login.your-system-domain
(.login.system.itp-inc.com). Rest leave all the fields to
defaults - Select Credhub. Add a key and secret under Encryption Keys and rest leave all the fields to defaults
- Select Databases and select Internal Databases – MySQL
- Select File Storage and select Internal WebDAV, you can use
other options if you plan to use external storage - Select System Logging and leave all the fields to defaults
- Select Customer Branding and leave all the fields to defaults
- Select Apps Manager and leave all the fields to defaults
- Select Email Notifications and leave all the fields to defaults
- Select App Autoscaler and leave all the fields to defaults
- Select Cloud Controller and leave all the fields to defaults
- Select Smoke Tests and leave all the fields to defaults
- Select Advanced Features and leave all the fields to defaults
- Select Errands turn off Notifications and Notifications UI since we are not using Emails and leave all the fields to defaults
- Select Resource Configs and leave all the fields to defaults
Note: Click save on all the above settings on every page
- click on Installation Dashboard to go back and Apply changes
It will take some time (approx. 60 to 120 mins) to install PAS and you can check logs if installation fails.

You can check the status of all the VMs by clicking on Pivotal Application Service tile and then click on the Status tab.


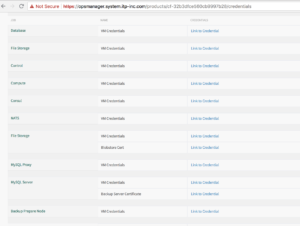
You can check the credentials of all the VMs by clicking on Pivotal Application Service tile and then click on Credentials tab. To login to Apps Manager and CF API please note Admin credentials under UAA

λ  ~/Downloads  cf api https://api.system.itp-inc.com --skip-ssl-validation
Setting api endpoint to https://api.system.itp-inc.com...
OK

api endpoint:   https://api.system.itp-inc.com
api version:    2.103.0
Not logged in. Use 'cf login' to log in.
λ  ~/Downloads
λ ~/Downloads cf login
API endpoint: https://api.system.itp-inc.com
Email> admin
Password>
Authenticating...
OK
Select an org (or press enter to skip):
1. itp-cloud-engineering
2. system
Org> 1
Targeted org itp-cloud-engineering
Targeted space paas
API endpoint: https://api.system.itp-inc.com (API version: 2.103.0)
User: admin
Org: itp-cloud-engineering
Space: paas
Note: Get Admin credentials under UAA from Credentials tab by clicking on PAS tile from installation dashboard
I have already created Org(itp-cloud-engineering) and space(paas), you can create them using below commands
λ  ~/Downloads  cf create-org itp-innovation-labs
Creating org itp-innovation-labs as admin...
OK

Assigning role OrgManager to user admin in org itp-innovation-labs ...
OK

TIP: Use 'cf target -o "itp-innovation-labs"' to target new org
λ  ~/Downloads
λ ~/Downloads cf create-space cloud-engineering -o itp-innovation-labs
Creating space cloud-engineering in org itp-innovation-labs as admin...
OK
Assigning role RoleSpaceManager to user admin in org itp-innovation-labs / space cloud-engineering as admin...
OK
Assigning role RoleSpaceDeveloper to user admin in org itp-innovation-labs / space cloud-engineering as admin...
OK
TIP: Use 'cf target -o "itp-innovation-labs" -s "cloud-engineering"' to target new spaceDeploy Sample Application
Sample Cloud foundry applications can be found on below link
We will use cf-sample-app-nodejs
https://github.com/cloudfoundry-samples/cf-sample-app-nodejs
λ  ~/Downloads  git clone https://github.com/cloudfoundry-samples/cf-sample-app-nodejs.git
Cloning into 'cf-sample-app-nodejs'...
remote: Counting objects: 88, done.
remote: Total 88 (delta 0), reused 0 (delta 0), pack-reused 88
Unpacking objects: 100% (88/88), done.
λ  ~/Downloads
λ ~/Downloads cd cf-sample-app-nodejs
λ cf-sample-app-nodejs master ✓ cf push
Pushing from manifest to org itp-cloud-engineering / space paas as admin...
Using manifest file /Users/bikramsingh/Downloads/cf-sample-app-nodejs/manifest.yml
Getting app info...
Creating app with these attributes...
+ name: cf-nodejs
path: /Users/bikramsingh/Downloads/cf-sample-app-nodejs
+ instances: 1
+ memory: 512M
routes:
+ cf-nodejs-active-civet.app.itp-inc.com
Creating app cf-nodejs...
Mapping routes...
Comparing local files to remote cache...
Packaging files to upload...
Uploading files...
714.28 KiB / 714.28 KiB [=====================================================================================] 100.00% 5s
Waiting for API to complete processing files...
Staging app and tracing logs...
Downloading binary_buildpack...
Downloading nodejs_buildpack...
Downloading go_buildpack...
Downloading staticfile_buildpack...
Downloading python_buildpack...
Downloaded python_buildpack
Downloading php_buildpack...
Downloaded staticfile_buildpack
Downloading dotnet_core_buildpack...
Downloaded binary_buildpack
Downloading java_buildpack_offline...
Downloaded nodejs_buildpack
Downloading ruby_buildpack...
Downloaded go_buildpack
Downloaded php_buildpack
Downloaded dotnet_core_buildpack
Downloaded ruby_buildpack
Downloaded java_buildpack_offline
Cell 92b34cdb-0d8d-4d00-82f9-b31d4586006f creating container for instance 4d38d14e-d187-4efc-8836-ded8ffb93eb8
Cell 92b34cdb-0d8d-4d00-82f9-b31d4586006f successfully created container for instance 4d38d14e-d187-4efc-8836-ded8ffb93eb8
Downloading app package...
Downloaded app package (1.2M)
-----> Nodejs Buildpack version 1.6.25
-----> Installing binaries
engines.node (package.json): unspecified
engines.npm (package.json): unspecified (use default)
**WARNING** Node version not specified in package.json. See: http://docs.cloudfoundry.org/buildpacks/node/node-tips.html
-----> Installing node 6.14.2
Copy [/tmp/buildpacks/180bd3e1f798f3affb7e6b743259c2b3/dependencies/fc7631adea611ac5bbf65365c90bb2d2/node-6.14.2-linux-x64-345ad39f.tgz]
Using default npm version: 3.10.10
-----> Installing yarn 1.7.0
Copy [/tmp/buildpacks/180bd3e1f798f3affb7e6b743259c2b3/dependencies/6efcd2cc3b2e0d59dd3062e6d5088845/yarn-v1.7.0-e7720ee3.tar.gz]
Installed yarn 1.7.0
-----> Creating runtime environment
PRO TIP: It is recommended to vendor the application's Node.js dependencies
Visit http://docs.cloudfoundry.org/buildpacks/node/index.html#vendoring
NODE_ENV=production
NODE_HOME=/tmp/contents998984204/deps/0/node
NODE_MODULES_CACHE=true
NODE_VERBOSE=false
NPM_CONFIG_LOGLEVEL=error
NPM_CONFIG_PRODUCTION=true
-----> Building dependencies
Installing node modules (package.json)
[email protected] /tmp/app
├─┬ [email protected]
│ ├─┬ [email protected]
│ │ ├─┬ [email protected]
│ │ │ └── [email protected]
│ │ └── [email protected]
│ ├── [email protected]
│ ├─┬ [email protected]
│ │ ├── [email protected]
│ │ ├─┬ [email protected]
│ │ │ └── [email protected]
│ │ ├── [email protected]
│ │ └─┬ [email protected]
│ │ └─┬ [email protected]
│ │ ├── [email protected]
│ │ └── [email protected]
│ ├── [email protected]
│ ├── [email protected]
│ ├── [email protected]
│ ├── [email protected]
│ ├─┬ [email protected]
│ │ └── [email protected]
│ ├── [email protected]
│ ├── [email protected]
│ ├── [email protected]
│ ├── [email protected]
│ ├─┬ [email protected]
│ │ └── [email protected]
│ ├── [email protected]
│ ├── [email protected]
│ ├── [email protected]
│ ├─┬ [email protected]
│ │ └── [email protected]
│ ├── [email protected]
│ ├── [email protected]
│ ├─┬ [email protected]
│ │ ├── [email protected]
│ │ └── [email protected]
│ ├── [email protected]
│ ├── [email protected]
│ ├── [email protected]
│ ├─┬ [email protected]
│ │ ├── [email protected]
│ │ └── [email protected]
│ ├── [email protected]
│ ├── [email protected]
│ ├── [email protected]
│ ├─┬ [email protected]
│ │ └── [email protected]
│ ├── [email protected]
│ └── [email protected]
└─┬ [email protected]
├── [email protected]
├─┬ [email protected]
│ ├─┬ [email protected]
│ │ └── [email protected]
│ └─┬ [email protected]
│ └── [email protected]
├── [email protected]
├─┬ [email protected]
│ └── [email protected]
├─┬ [email protected]
│ ├── [email protected]
│ └─┬ [email protected]
│ └── [email protected]
├─┬ [email protected]
│ └── [email protected]
├─┬ [email protected]
│ ├─┬ [email protected]
│ │ ├── [email protected]
│ │ └── [email protected]
│ ├─┬ [email protected]
│ │ └── [email protected]
│ └─┬ [email protected]
│ ├─┬ [email protected]
│ │ └── [email protected]
│ └── [email protected]
├─┬ [email protected]
│ ├── [email protected]
│ ├── [email protected]
│ └─┬ [email protected]
│ ├── [email protected]
│ ├─┬ [email protected]
│ │ ├─┬ [email protected]
│ │ │ ├─┬ [email protected]
│ │ │ │ ├─┬ [email protected]
│ │ │ │ │ └── [email protected]
│ │ │ │ ├── [email protected]
│ │ │ │ └── [email protected]
│ │ │ └── [email protected]
│ │ ├── [email protected]
│ │ └── [email protected]
│ ├── [email protected]
│ └── [email protected]
├── [email protected]
└─┬ [email protected]
├── [email protected]
└── [email protected]
Exit status 0
Uploading droplet, build artifacts cache...
Uploading build artifacts cache...
Uploading droplet...
Uploaded build artifacts cache (2.2M)
Uploaded droplet (17.2M)
Uploading complete
Cell 92b34cdb-0d8d-4d00-82f9-b31d4586006f stopping instance 4d38d14e-d187-4efc-8836-ded8ffb93eb8
Cell 92b34cdb-0d8d-4d00-82f9-b31d4586006f destroying container for instance 4d38d14e-d187-4efc-8836-ded8ffb93eb8
Cell 92b34cdb-0d8d-4d00-82f9-b31d4586006f successfully destroyed container for instance 4d38d14e-d187-4efc-8836-ded8ffb93eb8
Waiting for app to start...
name: cf-nodejs
requested state: started
instances: 1/1
usage: 512M x 1 instances
routes: cf-nodejs-active-civet.app.itp-inc.com
last uploaded: Mon 09 Jul 02:44:39 EDT 2018
stack: cflinuxfs2
buildpack: nodejs
start command: npm start
state since cpu memory disk details
#0 running 2018-07-09T06:45:26Z 0.0% 0 of 512M 0 of 1G
λ cf-sample-app-nodejs master ✓λ cf-sample-app-nodejs master ✓ cf app cf-nodejs
Showing health and status for app cf-nodejs in org itp-cloud-engineering / space paas as admin...
name: cf-nodejs
requested state: started
instances: 1/1
usage: 512M x 1 instances
routes: cf-nodejs-active-civet.app.itp-inc.com
last uploaded: Mon 09 Jul 02:44:39 EDT 2018
stack: cflinuxfs2
buildpack: nodejs
state since cpu memory disk details
#0 running 2018-07-09T06:45:26Z 0.2% 52.7M of 512M 63.6M of 1G
λ cf-sample-app-nodejs master ✓You can see above app is deployed and a route is also created which we can access in browser – cf-nodejs-active-civet.app.itp-inc.com

We can also check logs
λ  cf-sample-app-nodejs master ✓ cf logs cf-nodejs --recent
Retrieving logs for app cf-nodejs in org itp-cloud-engineering / space paas as admin...

   2018-07-09T02:44:43.74-0400 [STG/0] OUT Downloading binary_buildpack...
   2018-07-09T02:44:45.02-0400 [STG/0] OUT Downloading app package...
   2018-07-09T02:44:45.19-0400 [STG/0] OUT Downloaded app package (1.2M)
   2018-07-09T02:44:47.12-0400 [STG/0] OUT -----> Nodejs Buildpack version 1.6.25
   2018-07-09T02:44:47.14-0400 [STG/0] OUT -----> Installing binaries
   2018-07-09T02:44:47.14-0400 [STG/0] OUT        engines.node (package.json): unspecified
   2018-07-09T02:44:47.14-0400 [STG/0] OUT        engines.npm (package.json): unspecified (use default)
   2018-07-09T02:44:47.14-0400 [STG/0] OUT        **WARNING** Node version not specified in package.json. See: http://docs.cloudfoundry.org/buildpacks/node/node-tips.html
   2018-07-09T02:44:47.14-0400 [STG/0] OUT -----> Installing node 6.14.2
   2018-07-09T02:44:47.14-0400 [STG/0] OUT        Copy [/tmp/buildpacks/180bd3e1f798f3affb7e6b743259c2b3/dependencies/fc7631adea611ac5bbf65365c90bb2d2/node-6.14.2-linux-x64-345ad39f.tgz]
   2018-07-09T02:44:49.48-0400 [STG/0] OUT        Using default npm version: 3.10.10
   2018-07-09T02:45:06.67-0400 [STG/0] OUT │ ├── [email protected]
   2018-07-09T02:45:06.67-0400 [STG/0] OUT │ ├── [email protected]
   2018-07-09T02:45:06.67-0400 [STG/0] OUT │ ├── [email protected]
   2018-07-09T02:45:06.67-0400 [STG/0] OUT │ ├─┬ [email protected]
   2018-07-09T02:45:06.67-0400 [STG/0] OUT │ │ └── [email protected]
   2018-07-09T02:45:06.67-0400 [STG/0] OUT │ ├── [email protected]
   2018-07-09T02:45:06.67-0400 [STG/0] OUT │ ├── [email protected]
   2018-07-09T02:45:06.67-0400 [STG/0] OUT │ ├── [email protected]
   2018-07-09T02:45:06.67-0400 [STG/0] OUT │ ├── [email protected]
   2018-07-09T02:45:06.67-0400 [STG/0] OUT │ ├─┬ [email protected]
   2018-07-09T02:45:06.67-0400 [STG/0] OUT │ │ └── [email protected]
   2018-07-09T02:45:06.67-0400 [STG/0] OUT │ ├── [email protected]
   2018-07-09T02:45:06.67-0400 [STG/0] OUT │ ├── [email protected]
   2018-07-09T02:45:06.67-0400 [STG/0] OUT │ ├── [email protected]
   2018-07-09T02:45:06.67-0400 [STG/0] OUT │ ├─┬ [email protected]
   2018-07-09T02:45:06.67-0400 [STG/0] OUT │ │ └── [email protected]
   2018-07-09T02:45:06.67-0400 [STG/0] OUT │ ├── [email protected]
   2018-07-09T02:45:06.67-0400 [STG/0] OUT │ ├── [email protected]
   2018-07-09T02:45:06.67-0400 [STG/0] OUT │ ├─┬ [email protected]
   2018-07-09T02:45:06.67-0400 [STG/0] OUT │ │ ├── [email protected]
   2018-07-09T02:45:06.67-0400 [STG/0] OUT │ │ └── [email protected]
   2018-07-09T02:45:06.67-0400 [STG/0] OUT │ ├── [email protected]
   2018-07-09T02:45:06.67-0400 [STG/0] OUT │ ├── [email protected]
   2018-07-09T02:45:06.67-0400 [STG/0] OUT │ ├── [email protected]
   2018-07-09T02:45:06.67-0400 [STG/0] OUT │ ├─┬ [email protected]
   2018-07-09T02:45:06.67-0400 [STG/0] OUT │ │ └── [email protected]
   2018-07-09T02:45:06.67-0400 [STG/0] OUT │ ├── [email protected]
   2018-07-09T02:45:06.67-0400 [STG/0] OUT │ └── [email protected]
   2018-07-09T02:45:06.67-0400 [STG/0] OUT └─┬ [email protected]
   2018-07-09T02:45:06.67-0400 [STG/0] OUT   ├── [email protected]
   2018-07-09T02:45:06.67-0400 [STG/0] OUT   ├─┬ [email protected]
   2018-07-09T02:45:06.67-0400 [STG/0] OUT   │ ├─┬ [email protected]
   2018-07-09T02:45:06.67-0400 [STG/0] OUT   │ │ └── [email protected]
   2018-07-09T02:45:06.67-0400 [STG/0] OUT   │ └─┬ [email protected]
   2018-07-09T02:45:06.67-0400 [STG/0] OUT   │   └── [email protected]
   2018-07-09T02:45:06.67-0400 [STG/0] OUT   ├── [email protected]
   2018-07-09T02:45:06.67-0400 [STG/0] OUT   ├─┬ [email protected]
   2018-07-09T02:45:06.67-0400 [STG/0] OUT   │ └── [email protected]
   2018-07-09T02:45:06.67-0400 [STG/0] OUT   ├─┬ [email protected]
   2018-07-09T02:45:06.67-0400 [STG/0] OUT   │ ├── [email protected]
   2018-07-09T02:45:06.67-0400 [STG/0] OUT   │ └─┬ [email protected]
   2018-07-09T02:45:06.67-0400 [STG/0] OUT   │   └── [email protected]
   2018-07-09T02:45:06.67-0400 [STG/0] OUT   ├─┬ [email protected]
   2018-07-09T02:45:06.67-0400 [STG/0] OUT   │ └── [email protected]
   2018-07-09T02:45:06.67-0400 [STG/0] OUT   ├─┬ [email protected]
   2018-07-09T02:45:06.67-0400 [STG/0] OUT   │ ├─┬ [email protected]
   2018-07-09T02:45:06.67-0400 [STG/0] OUT   │ │ ├── [email protected]
   2018-07-09T02:45:06.67-0400 [STG/0] OUT   │ │ └── [email protected]
   2018-07-09T02:45:06.67-0400 [STG/0] OUT   │ ├─┬ [email protected]
   2018-07-09T02:45:06.67-0400 [STG/0] OUT   │ │ └── [email protected]
   2018-07-09T02:45:06.67-0400 [STG/0] OUT   │ └─┬ [email protected]
   2018-07-09T02:45:06.67-0400 [STG/0] OUT   │   ├─┬ [email protected]
   2018-07-09T02:45:06.67-0400 [STG/0] OUT   │   │ └── [email protected]
   2018-07-09T02:45:06.67-0400 [STG/0] OUT   │   └── [email protected]
   2018-07-09T02:45:06.67-0400 [STG/0] OUT   ├─┬ [email protected]
   2018-07-09T02:45:06.67-0400 [STG/0] OUT   │ ├── [email protected]
   2018-07-09T02:45:06.67-0400 [STG/0] OUT   │ ├── [email protected]
   2018-07-09T02:45:06.67-0400 [STG/0] OUT   │ └─┬ [email protected]
   2018-07-09T02:45:06.67-0400 [STG/0] OUT   │   ├── [email protected]
   2018-07-09T02:45:06.67-0400 [STG/0] OUT   │   ├─┬ [email protected]
   2018-07-09T02:45:06.67-0400 [STG/0] OUT   │   │ ├─┬ [email protected]
   2018-07-09T02:45:06.67-0400 [STG/0] OUT   │   │ │ ├─┬ [email protected]
   2018-07-09T02:45:06.67-0400 [STG/0] OUT   │   │ │ │ ├─┬ [email protected]
   2018-07-09T02:45:06.67-0400 [STG/0] OUT   │   │ │ │ │ └── [email protected]
   2018-07-09T02:45:06.67-0400 [STG/0] OUT   │   │ │ │ ├── [email protected]
   2018-07-09T02:45:06.67-0400 [STG/0] OUT   │   │ │ │ └── [email protected]
   2018-07-09T02:45:06.67-0400 [STG/0] OUT   │   │ │ └── [email protected]
   2018-07-09T02:45:06.67-0400 [STG/0] OUT   │   │ ├── [email protected]
   2018-07-09T02:45:06.67-0400 [STG/0] OUT   │   │ └── [email protected]
   2018-07-09T02:45:06.67-0400 [STG/0] OUT   │   ├── [email protected]
   2018-07-09T02:45:06.67-0400 [STG/0] OUT   │   └── [email protected]
   2018-07-09T02:45:06.67-0400 [STG/0] OUT   ├── [email protected]
   2018-07-09T02:45:06.67-0400 [STG/0] OUT   └─┬ [email protected]
   2018-07-09T02:45:06.67-0400 [STG/0] OUT     ├── [email protected]
   2018-07-09T02:45:06.67-0400 [STG/0] OUT     └── [email protected]
   2018-07-09T02:45:10.46-0400 [STG/0] OUT Exit status 0
   2018-07-09T02:45:10.46-0400 [STG/0] OUT Uploading droplet, build artifacts cache...
   2018-07-09T02:45:10.46-0400 [STG/0] OUT Uploading build artifacts cache...
   2018-07-09T02:45:10.46-0400 [STG/0] OUT Uploading droplet...
   2018-07-09T02:45:10.92-0400 [STG/0] OUT Uploaded build artifacts cache (2.2M)
   2018-07-09T02:45:12.32-0400 [API/0] OUT Creating droplet for app with guid 5db68d35-89d2-4124-b540-22a0bcfa56b1
   2018-07-09T02:45:15.50-0400 [STG/0] OUT Uploaded droplet (17.2M)
   2018-07-09T02:45:15.50-0400 [STG/0] OUT Uploading complete
   2018-07-09T02:45:15.56-0400 [STG/0] OUT Cell 92b34cdb-0d8d-4d00-82f9-b31d4586006f stopping instance 4d38d14e-d187-4efc-8836-ded8ffb93eb8
   2018-07-09T02:45:15.56-0400 [STG/0] OUT Cell 92b34cdb-0d8d-4d00-82f9-b31d4586006f destroying container for instance 4d38d14e-d187-4efc-8836-ded8ffb93eb8
   2018-07-09T02:45:15.97-0400 [CELL/0] OUT Cell da4f0c8e-de3e-4497-ba2a-c53cdb2629c5 creating container for instance 0a74077f-9c76-4f98-569f-5b72
   2018-07-09T02:45:16.53-0400 [STG/0] OUT Cell 92b34cdb-0d8d-4d00-82f9-b31d4586006f successfully destroyed container for instance 4d38d14e-d187-4efc-8836-ded8ffb93eb8
   2018-07-09T02:45:17.06-0400 [CELL/0] OUT Cell da4f0c8e-de3e-4497-ba2a-c53cdb2629c5 successfully created container for instance 0a74077f-9c76-4f98-569f-5b72
   2018-07-09T02:45:21.82-0400 [CELL/0] OUT Starting health monitoring of container
   2018-07-09T02:45:24.24-0400 [APP/PROC/WEB/0] OUT > [email protected] start /home/vcap/app
   2018-07-09T02:45:24.24-0400 [APP/PROC/WEB/0] OUT > node server.js
   2018-07-09T02:45:26.70-0400 [CELL/0] OUT Container became healthy
  ......
  .......
   2018-07-09T02:50:57.10-0400 [RTR/0] OUT cf-nodejs-active-civet.app.itp-inc.com - [2018-07-09T06:50:57.102+0000] "GET /ping.txt HTTP/1.1" 304 0 0 "http://cf-nodejs-active-civet.app.itp-inc.com/" "Mozilla/5.0 (Macintosh; Intel Mac OS X 10_13_4) AppleWebKit/537.36 (KHTML, like Gecko) Chrome/67.0.3396.99 Safari/537.36" "10.9.86.249:51854" "10.9.86.39:61012" x_forwarded_for:"10.9.100.79, 10.9.86.249" x_forwarded_proto:"http" vcap_request_id:"989e1aa3-9aee-4505-69e8-b5917debbc34" response_time:0.00571559 app_id:"5db68d35-89d2-4124-b540-22a0bcfa56b1" app_index:"0" x_b3_traceid:"4f2c8389d3cad8f0" x_b3_spanid:"4f2c8389d3cad8f0" x_b3_parentspanid:"-"
   2018-07-09T02:50:57.10-0400 [RTR/0] OUT
λ  cf-sample-app-nodejs master ✓
Or, stream live logs:
cf logs cf-spring
Restart the app:
cf restart cf-nodejs
Horizontally Scale the App : Changes the number of instances. We will increase from 1 instance to 3
λ  cf-sample-app-nodejs master ✓ cf scale cf-nodejs -i 3
Scaling app cf-nodejs in org itp-cloud-engineering / space paas as admin...
OK
λ  cf-sample-app-nodejs master ✓ cf app cf-nodejs
Showing health and status for app cf-nodejs in org itp-cloud-engineering / space paas as admin...

name:              cf-nodejs
requested state:   started
instances:         3/3
usage:             512M x 3 instances
routes:            cf-nodejs-active-civet.app.itp-inc.com
last uploaded:     Mon 09 Jul 02:44:39 EDT 2018
stack:             cflinuxfs2
buildpack:         nodejs

     state     since                  cpu    memory        disk          details
#0   running   2018-07-09T06:45:26Z   0.1%   53M of 512M   63.6M of 1G
#1   running   2018-07-09T06:59:47Z   0.0%   40K of 512M   8K of 1G
#2   running   2018-07-09T06:59:50Z   0.0%   0 of 512M     0 of 1G
λ  cf-sample-app-nodejs master ✓
Vertically Scale the App : Changes the disk space limit or memory limit for each app instance.
Increase the memory limit for each app instance:
λ  cf-sample-app-nodejs master ✓ cf scale cf-nodejs -m 1G

This will cause the app to restart. Are you sure you want to scale cf-nodejs?> yes

Scaling app cf-nodejs in org itp-cloud-engineering / space paas as admin...
OK
Stopping app cf-nodejs in org itp-cloud-engineering / space paas as admin...
OK

Starting app cf-nodejs in org itp-cloud-engineering / space paas as admin...

0 of 3 instances running, 3 starting
1 of 3 instances running, 2 starting

App started


OK

App cf-nodejs was started using this command `npm start`

Showing health and status for app cf-nodejs in org itp-cloud-engineering / space paas as admin...
OK

requested state: started
instances: 3/3
usage: 1G x 3 instances
urls: cf-nodejs-active-civet.app.itp-inc.com
last uploaded: Mon Jul 9 06:44:39 UTC 2018
stack: cflinuxfs2
buildpack: nodejs

     state      since                    cpu    memory        disk          details
#0   running    2018-07-09 03:03:33 AM   0.1%   53.4M of 1G   63.6M of 1G
#1   starting   2018-07-09 03:03:26 AM   0.0%   44K of 1G     8K of 1G
#2   starting   2018-07-09 03:03:26 AM   0.0%   44.9M of 1G   63.6M of 1G
Increase the disk limit for each app instance:
λ cf-sample-app-nodejs master ✓ cf scale cf-nodejs -k 512M
This will cause the app to restart. Are you sure you want to scale cf-nodejs?> yes
Scaling app cf-nodejs in org itp-cloud-engineering / space paas as admin...
OK
Stopping app cf-nodejs in org itp-cloud-engineering / space paas as admin...
OK
Starting app cf-nodejs in org itp-cloud-engineering / space paas as admin...
0 of 3 instances running, 3 starting
1 of 3 instances running, 2 starting
App started
OK
App cf-nodejs was started using this command `npm start`
Showing health and status for app cf-nodejs in org itp-cloud-engineering / space paas as admin...
OK
requested state: started
instances: 3/3
usage: 1G x 3 instances
urls: cf-nodejs-active-civet.app.itp-inc.com
last uploaded: Mon Jul 9 06:44:39 UTC 2018
stack: cflinuxfs2
buildpack: nodejs
state since cpu memory disk details
#0 running 2018-07-09 03:05:02 AM 0.6% 15.1M of 1G 63.6M of 512M
#1 starting 2018-07-09 03:04:56 AM 0.8% 15M of 1G 63.6M of 512M
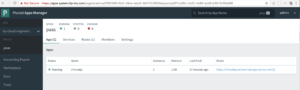
#2 starting 2018-07-09 03:04:56 AM 0.7% 15M of 1G 63.6M of 512MPAS also has a GUI called Apps Manager which can also be used manage PAS.
GUI can be accessed by going to below URL login.SYSTEM-DOMAIN


You can learn more about Apps Manager at below URL
https://docs.pivotal.io/pivotalcf/2-1/console/index.html
Explore more about Pivotal cloud Foundy :
How PCF Works
https://docs.pivotal.io/pivotalcf/concepts
PCF Documentation
https://docs.pivotal.io/pivotalcf/installing/pcf-docs.html
Installing PCF (IaaS-specific guides for installing PCF)
https://docs.pivotal.io/pivotalcf/installing/
Learn more about the Spring Framework
https://spring.io/guides
Explore and download more Cloud Foundry sample apps
https://github.com/cloudfoundry-samples/
In next blog we will try to cover Pivotal Container Server(PKS) it enables operators to provision, operate, and manage enterprise-grade Kubernetes clusters
Thank you
Cloud Engineering, Intuitive Innovation Labs
