
VMC on AWS – HCX Deployment & Configuration of Service Mesh
By Bharath Babbur / May 17,2022


Hybrid Cloud extension has already become a popular solution for Cloud migrations, this great tool is available as an add-on with VMware cloud on AWS for on-prem to cloud migration or vice-versa. The beauty of the tool is it makes migration a very seamless experience. As of today, HCX is a free option available with VMware cloud on AWS subscription.
In this blog post I want to specifically talk about how to configure HCX for VMware Cloud on AWS, however before starting with the implementation, let’s have an overview of what VMC on AWS offers.
VMware and AWS offer enterprises a faster, secure path to the cloud. you can continue to Use your current skills, processes, and governance to deliver secure virtual apps and desktops with VMC’s Virtual Desktop Infrastructure (VDI) solutions to enable employees to work securely from any location. With VMware Cloud on AWS you can migrate datacenters to the cloud for rapid datacenter evacuation, disaster recovery, and application modernization. With over 3 years of joint engineering, VMware provides organizations with enhanced VMware functionalities integrated in the solution.

Deployment of HCX on VMC and On-Prem SDDC
Log in to the VMC Console at https://vmc.vmware.com


On the “Add Ons” tab of your SDDC, click Open HCX on the HCX card.
The VMware HCX interface opens.
On the Add Ons tab of your SDDC, click Open HCX on the HCX card.


Navigate to the SDDC tab and click Open HCX
Navigate to the SDDC tab and click Deploy HCX and click Confirm to initiate the deployment.


The VMC activation is created and displayed, and the deployment begins. This step takes several minutes to complete. After the deployment is complete, hcx_cloud_manager appears in the vCenter console.
The VMware HCX Cloud service interface opens, the URL reads https://hcx.sddc.*.vmwarevmc.com. Enter the [email protected] user and credentials and click Log In.

The Main components of HCX are:
- HCX Manager (or HCX Enterprise Manager) : HCX Manager is the central command center appliance through which we begin our HCX deployment Journey, this is available as an OVA and gets registered with our vCenter and installs a plugin for performing installation of HCX components and other VM migration tasks.
- HCX Interconnect service: HCX Interconnect service provides resilient access over the Internet and private lines to the target site while providing strong encryption, traffic engineering and extending the datacenter. This service simplifies secure pairing of sites and management of HCX components.
- WAN Optimization Service: Improves performance characteristics of the private lines or Internet paths by leveraging WAN Optimization techniques like data de-duplication and line conditioning. This makes performance closer to a LAN environment.
- Network Extension Service: High throughput Network Extension service with integrated Proximity Routing which unlocks seamless mobility and simple disaster recovery plans across sites.
Once the HCX is deployed and logged in into on the VMC Cloud, we need to download and installed the HCX Client on the On-Prem SDDC Side to prepare the two for the Site Pairing with HCX.
To download the Client, scroll to the bottom of the Dashboard Page and click “Download VMware HCX Client”.
The Dashboard initially will be blank and all counters showing Zero. However, post integration to on-prem SDDC, the dash boards will look like as shown below in the sample screenshot.

Or Navigate to the “System Updates” on the Left pane and click on “Request Download Link”

Go Back to the VMC Home page and navigate to “Settings” and Collect and note the HCX details before starting to deploy and configure the On-Prem HCX OVA

Once the HCX client OVA is downloaded, copy it into the On-Prem SDDC and deploy the OVA in the vCenter.
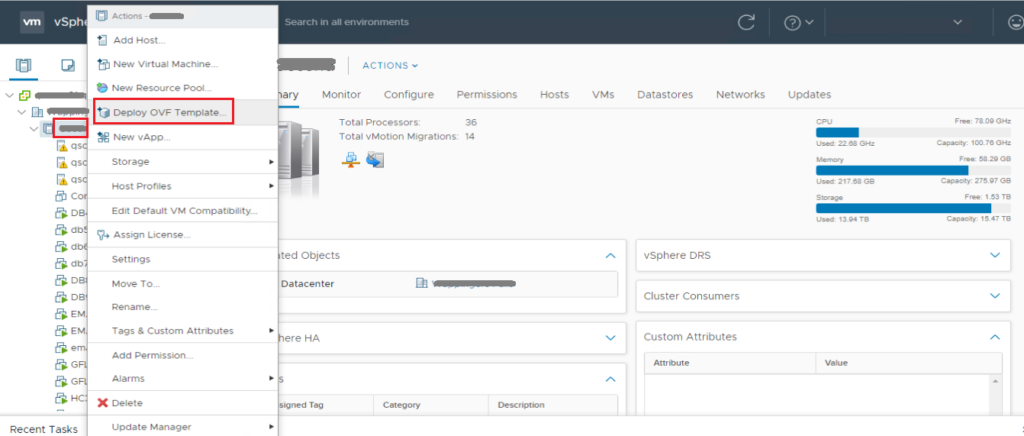
Login into the on-prem vCenter and right click on the cluster you wish you deploy the HCX in and click “Deploy OVF Template”.
Select the OVF by navigating to the file location by clicking “Choose Files”

Give a Name to identify the VM by and click “Next”.

Follow the normal OVA deployment process and select the cluster under which you intend to deploy the VM.

Read the review details of the product and click “Next”.

Accept the EULA and click “Next”.

Select the Storage / Datastore / Datastore cluster and the Network segment on which to place the new VMs and move to the next step.
In the Next Step provide the admin / root passwords and scroll down to complete the configuration items.

Provide the Hostname and other networking details for the HCX Manager appliance.

Do not enable “SSH” unless required.

In the Next step, Review the settings and complete the deployment.
Configuration of HCX Service Mesh and Pre-Requisites
All the configurations of the HCX will be done initially Only on the On-prem SDDC vCenter
After the deployment its time for the activation and registration process, we can open the HCX manager page by providing its FQDN or IP on port 9443, using admin as user and the password we supplied during the OVA deployment. which will directly give us the page for the registration where we will find the URL mentioned for activation as “https://connect.hcx.vmware.com” and its asking for the activation key, paste the activation key and click on Continue.

Go Back to your VMC portal and navigate to the HCX Card and select the “Activation Keys” Tab and click on “Create Activation Key”, wait for a couple of minutes and use the activation key generated to activate the on-prem HCX

Next, we will be prompted to select the city and location of the on-prem HCX manager. select and click yes and continue and the activation will get completed
Next screen is the registration with on-prem vCenter (vCenter FQDN, admin username and password)

If NSX registration is required (For extending the VxLAN networks) select connect our NSX and enter the username and password for NSX manager click continue.
Enter the SSO username and password and Click Continue.

We need to specify the user group that’s configured within the on-prem datacenter as an “Administrator” role.

To get everything correct and in working condition click on Restart HCX service (it takes 5 minutes to reinitialize the HCX)

We need to Stop the “Web services” and then the “Application service” and restart it in the order Application services First and then the Web services.
We may have to keep refreshing the page and once everything is up and running, we will see the dashboard with all the updated information.
Configuration of Service Mesh
Login into the vCenter and navigate to Menu > HCX

Go to “Site Pairing” in he left navigation pane and click on “Add a Site Pairing”.
Use the Remote HCX URL noted on earlier step along with the username and password for the HCX on the VMC on AWS.

Just Ensure all Firewall ports are opened as per VMware recommendation before you proceed.
Once Successfully paired with the HCX on the VMC end, you should see the pairing on the right pane.

Now lets start creating the Service Mesh Pre-Requisites, Starting with the “Compute Profile”

Start by giving your Compute profile a “Name” Identifier.

Now Select or un-select the services you like to enable on the HCX Mesh
You can de-select the option by just click on the service as I have de-selected the “Disaster Recovery” option as shown below.

In the next step, select the Datacenter and HA/DRS Cluster with the on-prem vCenter which needs to be part of the compute profile.
Note: If there is only one cluster, it is selected automatically

Select the Datastore/s from the Auto-discovered list of Datastores that will be visible in the drop-down

For the Next Step you need to as a Pre-Requisite create and keep ready an “Network Profile”


Select the vCenter if not pre-selected. If you are working with multiple vCenters then you need to select the appropriate vcenter
Next you need to select if you are working with the DV Switch, Standard Switch on NSX vxLAN.
Next provide the IP pool which HCX should use to deploy and communicate to the other HCX VMs like WAN optimizer, L2 extension etc.
Click “create”

Now back to the Compute Profile creation wizard

You can add Static route if your network design demands it.

Select the uplink network profile from the list of network profiles created. If there is just one its pre-selected.

Select the vMotion Network and set the Static route in “Advance Configuration” if required

Select the Replication network profile in this step

Select the DvSwitch port group which will be used for the network extension and if there is a limitation of IPs, then you can set the limitation of appliances that will be deployed and click “Continue”

Here the HCX will provide the Firewall rules and recommendations on which ports needs to be allowed, Share that with the network team and click “Continue”


Finally, we start creating the Service Mesh now.

First select the sites between which the Mesh needs to be created

Select the “compute profile” that you created manually on the On-Prem side and select the profile auto-created on the VMC side.

Now select the services you need to enable on the mesh.

Select the Source and Destination Network mapping and continue


Review the configuration


Give the mesh an Identifier Name

Finally, the Service Mesh is created
L2 Network Extension
After completing the Service Mesh configuration and synch between the On-prem and VMC on AWS SDDCs, the next step is to extend your on-prem Network to your VMC SDDC, so that we can start moving migrating VMs to the cloud.
Using the HCX user interface, follow these steps to extend one or more Distributed Port Groups:
- In the HCX dashboard, select Network Extension.
- At the top of the page, select Extend Network.
- Select one or more Distributed Port Groups or NSX Logical Switches.
- Select the Remote Site Connection. (Note: If you have only one site, it is selected by default)
- Select the Extension appliance in the Power by column.
- Provide the Gateway IP and Prefix Length for the network being extended in the format . For example: 192.168.10.1/24.
- (Optional but recommended ) To enable Proximity Routing, toggle the PR switch.
- Click Extend to finish.
- To view the task status, navigate to the HCX Dashboard and scroll down to the Activity Logs display.

Validation of successful configuration
Now Lets vMotion a VM from On-Prem to VMC and check if the VM is able to reach the Gateway that is still on-Prem there by validating the configuration done till now.
The vMotion needs to be initiated from the HCX Dashboard.
- Click on the “Migration” option on the left Pane
- click on the “Migrate Virtual Machine” option on the right pane.
- Select the VM from the List shown on the right pane, that is from one of the cluster/s selected to be part of the service mesh / compute profile.
- Once VM Selected, we need to select the Destination resource pool, network logical switch, and Datastore on which the VM needs to connect once moved into the VMC Cloud SDDC.
- Click Migrate.
- Monitor the vMotion as shown below on the dashboard


- Validate the VMC on AWS SDDC vCenter for the VM migrated to be listed in the inventory
- Validate the Resource Pool in which the VM is residing
- Validate the Network Logical Switch to which it is connected
- Validate the Datastore on which VM files are on, if you have multiple Datastores

Now from within the Test VM, try reaching the network gateway, which is still on-prem.

Congratulation, you have successfully migrated the VM on the extended network between your on-prem and VMC SDDC and validated its communication to the on-prem network gateway.
There are other migration methods supported by HCX, such as listed below which we will discuss about in detail, in the subsequent blogs. In the mean time I have hyperlinked VMware Docs for a quick read about the methods in the mean time.
- Bulk Migration:
Bulk migration uses the host-based replication to move a virtual machine between HCX data centers - HCX vMotion:
VMware HCX vMotion can transfer a live Virtual Machine from a VMware HCX-enabled vCenter Server to a VMware HCX-enabled destination site - HCX Cold Migration:
Cold migration uses the same network path as VMware HCX vMotion to transfer a powered-off virtual machine. During a cold migration, the Virtual Machine IP address and MAC address are preserved. Cold migrations must satisfy the vMotion requirements. - HCX Replcation Assisted vMotion:
VMware HCX Replication Assisted vMotion (RAV) uses the HCX Interconnect appliance along with replication and vMotion technologies to provide large scale, parallel migrations with zero downtime.
Congratulation on configuring HCX and moving your VM/s into the VMC cloud.
