Build a CI/CD pipeline on AWS using Spinnaker multi-cloud continuous delivery platform
By Intuitive / Jun 12,2018
Overview
In this blog, we are going learn about deploying the HelloWorld app on AWS provider using multi-cloud continuous delivery platform Spinnaker. Starting from setting up necessary configuration on AWS provider in order to spinnaker access the resources in AWS provider and also will be showing how to create a pipeline in spinnaker to deploy the demo app.
Prerequisites
- Following components need to be setup in AWS provider.
- AWS Account
- VPC
- EC2 IAM Role
- EC2 Key Pair
- S3 Bucket
- Access Keys
- Adding account to spinnaker
- Running Spinnaker instance.
Configre AWS Provider
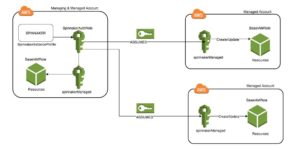
There are two types of accounts in the Spinnaker AWS provider; however, the distinction is not made in how they are configured using Halyard, but instead how they are configured in AWS.
- Managing accounts There is always exactly one managing account, this account is what Spinnaker authenticates as, and if necessary, assumes roles in the managed accounts.
- Managed accounts Every account that you want to modify resources in is a managed account. These will be configured to grant AssumeRole access to the managed account. This includes the managing account!
Note: Throughout the blog, I am going to use AWS region as a us-east-1 (N.Virginia).
- Ref: Spinnaker.io
Setup VPC:
- Create VPC with a single public subnet as per below.

• Create one more subnet for High availability.

Note: Vpc and subnet name tag has to be created as per Netflix terms for ref: https://github.com/Netflix/asgard/wiki/VPC-Configuration.
Setup EC2 IAM Role
- First, create an EC2 BaseIAMRole role this is the role instance is launched or deployed with spinnaker.

• Create a managing account policy with a name of SpinnakerAssumeRolePolicy using below json script.
{
"Version": "2012-10-17",
"Statement": [{
"Action": "sts:AssumeRole",
"Resource": [
"arn:aws:iam::${MANAGING_ACCOUNT_ID}:role/spinnakerManaged",
"arn:aws:iam::${MANAGED_ACCOUNT_ID}:role/spinnakerManaged"
],
"Effect": "Allow"
}]
}
• Create a user with a name of Spinnaker to authenticate with accesskeyID and secreatkeyID. Add the PowerUserAccess and SpinnakerAssumeRolePolicy to the user while creating. Remember to download the secret access key from the user and also copy the user ARN.

• Create a Spinnaker managed policy with a name of SpinnakerPassRole using below json script.
{
    "Version": "2012-10-17",
    "Statement": [{
        "Effect": "Allow",
        "Action": [ "ec2:*" ],
        "Resource": "*"
    },
    {
        "Effect": "Allow",
        "Action": "iam:PassRole",
        "Resource": "arn:aws:iam::${MANAGING_ACCOUNT_ID}:role/BaseIAMRole"
    }]
}
Ref: Github/Spinnakercourse
• Create a SpinnakerManaged role in IAM.

• Update the trust relationship in spinnakerManaged role using the below json script mentioning the Spinnaker user ARN which we copied previously.
{
    "Version": "2012-10-17",
    "Statement": [{
        "Sid": "1",
        "Effect": "Allow",
        "Principal": {
            "AWS": "${AUTH_ARN}"
        },
    "Action": "sts:AssumeRole"
    }]
}
Setup EC2 Keypair
• Here, I created a keypair with a name of SpinnakerAWS as we needed to ssh to the instance.

Setup S3 Bucket
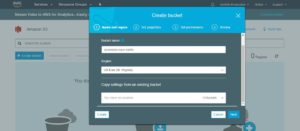
• Spinnaker need an external storage to store the application settings and configure a pipeline, In this we are going to use S3 as a storage. Create a bucket with preferred name.
Adding S3 Persistence Storage to Spinnaker
• Use the below command to authenticate with AWS to access S3, use the access secret key which we got from spinnaker user.
ubuntu@spinnaker:~$ hal config storage s3 edit --access-key-id AKIAIVW7V2T4VTHXD7GQ --secret-access-key
Your AWS Secret Key.:
+ Get current deployment
  Success
+ Get persistent store
  Success
+ Edit persistent store
  Success
+ Successfully edited persistent store "s3".
ubuntu@spinnaker:~$
Add AWS Provider to Spinnaker
- Authenticate AWS provider with access secret key.
ubuntu@spinnaker:~$ hal config provider aws edit --access-key-id AKIAIVW7V2T4VTHXD7GQ --secret-access-key
Your AWS Secret Key.. Note that if you are baking AMI's via Rosco, you may also need to set the secret key on the AWS bakery default options.:
+ Get current deployment
  Success
+ Get the aws provider
  Success
+ Edit the aws provider
  Success
+ Successfully edited provider aws.
ubuntu@spinnaker:~$
• Add the AWS provider to spinnaker.
ubuntu@spinnaker:~$ hal config provider aws account add karthik-production --account-id 227181981646 --assume-role role/spinnakerManaged
+ Get current deployment
  Success
+ Add the karthik-production account
  Success
Problems in default.provider.aws.karthik-production:
- WARNING No validation for the AWS provider has been
  implemented.

+ Successfully added account karthik-production for provider
  aws.
ubuntu@spinnaker:~$
ubuntu@spinnaker:~$ hal config provider aws account edit karthik-production --regions us-east-1
+ Get current deployment
Success
+ Get karthik-production account
Success
+ Edit the karthik-production account
Success
Problems in default.provider.aws.karthik-production:
- WARNING No validation for the AWS provider has been
implemented.
+ Successfully edited account karthik-production for provider
aws.
ubuntu@spinnaker:~$ubuntu@spinnaker:~$ hal config provider aws enable
+ Get current deployment
Success
+ Edit the aws provider
Success
Problems in default.provider.aws.karthik-production:
- WARNING No validation for the AWS provider has been
implemented.
+ Successfully enabled aws
ubuntu@spinnaker:~$
• Finally run the command sudo hal deploy apply to update the changes to spinnaker.
Altering the Necessary Configuration
• I have Helloword demo app as a Debian package on my local machine where spinnaker is running.
ubuntu@spinnaker:~/demoapp$ ls
dists  pool
ubuntu@spinnaker:~/demoapp$
• Now I am going to sync this Debian package to S3 bucket spinnaker-repo-karthi which I created.
• AWS CLI needs to be installed and configured in order access S3.
ubuntu@spinnaker:~/demoapp$ aws configure --profile default
AWS Access Key ID [None]: AKIAIVW7V2T4VTHXD7GQ
AWS Secret Access Key [None]: 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
Default region name [None]: us-east-1
Default output format [None]:
ubuntu@spinnaker:~/demoapp$
• The below command will sync the local demoapp Debian package to s3.
ubuntu@spinnaker:~/demoapp$ aws s3 sync . s3://spinnaker-repo-karthi
upload: dists/xenial/InRelease to s3://spinnaker-repo-karthi/dists/xenial/InRelease
upload: dists/xenial/main/binary-amd64/Packages.bz2 to s3://spinnaker-repo-karthi/dists/xenial/main/binary-amd64/Packages.bz2
upload: dists/xenial/main/binary-amd64/Release to s3://spinnaker-repo-karthi/dists/xenial/main/binary-amd64/Release
upload: dists/xenial/main/Contents-amd64.gz to s3://spinnaker-repo-karthi/dists/xenial/main/Contents-amd64.gz
upload: dists/xenial/Release to s3://spinnaker-repo-karthi/dists/xenial/Release
upload: dists/xenial/main/binary-amd64/Packages.gz to s3://spinnaker-repo-karthi/dists/xenial/main/binary-amd64/Packages.gz
upload: dists/xenial/Release.gpg to s3://spinnaker-repo-karthi/dists/xenial/Release.gpg
upload: dists/xenial/main/binary-amd64/Packages to s3://spinnaker-repo-karthi/dists/xenial/main/binary-amd64/Packages
upload: pool/main/n/node-demo-app/node-demo-app_0.0.1_amd64.deb to s3://spinnaker-repo-karthi/pool/main/n/node-demo-app/node-demo-app_0.0.1_amd64.deb
ubuntu@spinnaker:~/demoapp$
• As we can see below the Debian package sync to S3.

• Make the below Debian packages to public.
• AmazonS3/spinnaker-repo-karthi/pool/main/n/node-demo-app/node-demo-app_0.0.1_amd64.deb
• AmazonS3/spinnaker-repo-karthi/dists/xenial/main/binary-amd64
• Next step, Create a two EC2 security group one is to allow external traffic to hit a demo app and then another one allow communication between the ALB and EC2.


Let’s copy the Rosco file and do the necessary changes where the spinnaker is running. Basically, Rosco is a bakery which will allow spinnaker to create the image.
• cp /opt/rosco/config/rosco.yml .hal/default/profiles
• Edit the rosco.yml with the below changes.
• Change the configDir: /opt/rosco/config/packer/
• Add the debian repository as a S3 debianRepository: https://s3.amazonaws.com/spinnaker-debian-repo-jorn/ xenial main.
• Enable the AWS provider as true enabled: true
• Add the below script to build a image for the app to run on and also edit the source AMI id for the respective region.
- baseImage:
      id: ubuntu xenial
      shortDescription: v16.04
      detailedDescription: Ubuntu Xenial 16.04 LTS
      packageType: deb
      # You can specify the templateFile used for this baseImage.
      # If not specified, the default templateFile will be used.
      templateFile: aws-ebs.json
    virtualizationSettings:
    - region: us-east-1
      virtualizationType: hvm
      instanceType: t2.micro
      sourceAmi: ami-43a15f3e
      sshUserName: ubuntu
      spotPrice: 0
      spotPriceAutoProduct: Linux/UNIX (Amazon VPC)
Ref: Github/Spinnakercourse
Let’s Deploy the Demoapp using Spinnaker Pipeline
• Create a demo application in spinnaker.

• Now we need to create a load balancer selecting the VPC and security group accordingly which we created in AWS account.


• Next step we are going to create a pipeline with bake and deploy stages.
*First stage create a bake pipeline mentioning the package name.
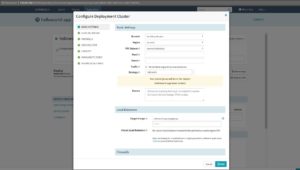
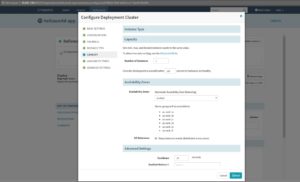
*Second stage create Deploy section with necessary settings enabled. Need to configure deployment cluster as well as below.



• Now we are good to go and start the manual execution of the pipeline.
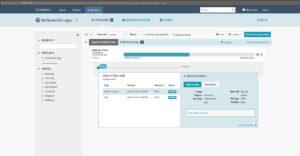

• The HelloWorld app has been deployed successfully on AWS provider using spinnaker pipeline. Please find the below running EC2 instance where our demo app deployed which is launched by spinnaker.

• Let’s try accessing the HelloWorld app using ELB DNS name demoapp-1886362877.us-east-1.elb.amazonaws.com.


