
Build Highly Available Kubernetes v1.7.4 Cluster with Calico and Docker
By Bikram Singh / Mar 12,2018
Overview
In this article we will learn to configure Kubernetes v1.7.4 Highly available cluster with distributed Kubernetes masters , etcd nodes and kubernetes worker nodes. We have used Calico for networking with Container Network Interface(CNI) plugin . Docker is used as container runtime engine. etcd is used as datastore to store the kubernetes cluster state data and calico networking (nodes ,ipPools etc.) information . All the servers used are Virtual machines running on Openstack.
Prerequisites
To complete this article, you will need below Infrastructure:
- Ubuntu 16.04 x86_64 for all the Kubernetes nodes
- CentOS x86_64 7.3 for etcd cluster(Ubuntu can be also used)
- 3x Kubernetes masters
- 3x Kubernetes worker nodes (minions)
- 3x etcd nodes
Kubernetes master nodes
kube-apiserver-1.scaleon.io -- 172.16.10.62
kube-apiserver-2.scaleon.io -- 172.16.10.63
kube-apiserver-3.scaleon.io -- 172.16.10.64
Kubernetes worker nodes
kube-worker-1.scaleon.io -- 172.16.10.65
kube-worker-2.scaleon.io -- 172.16.10.66
kube-worker-3.scaleon.io -- 172.16.10.67
etcd nodes
kube-etcd-1.scaleon.io --- 172.16.10.59
kube-etcd-2.scaleon.io --- 172.16.10.60
kube-etcd-3.scaleon.io --- 172.16.10.61
Kubernetes High-Availability
To build a highly available kubernetes cluster we need to configure multiple components in distributed fashion to avoid any single point of failure and make them scalable. Below diagram shows how HA looks in kubernetes.

source : https://kubernetes.io
Cluster Architecture
Below is the high level architecture of our cluster which we are going to build from scratch.

Lets take a look at all the components involved and their role.
Kubernetes Master Components
Master components provide the cluster’s control plane. Master components make global decisions about the cluster (for example, scheduling), and detecting and responding to cluster events (starting up a new pod when a replication controller’s ‘replicas’ field is unsatisfied).
kube-apiserver
kube-apiserver exposes the Kubernetes API. It is the front-end for the Kubernetes control plane. It is designed to scale horizontally – that is, it scales by deploying more instances.
etcd
etcd is used as Kubernetes’ backing store. All cluster data is stored here. Always have a backup plan for etcd’s data for your Kubernetes cluster.
kube-controller-manager
kube-controller-manager runs controllers, which are the background threads that handle routine tasks in the cluster. Logically, each controller is a separate process, but to reduce complexity, they are all compiled into a single binary and run in a single process.
These controllers include:
- Node Controller: Responsible for noticing and responding when nodes go down.
- Replication Controller: Responsible for maintaining the correct number of pods for every replication controller object in the system.
- Endpoints Controller: Populates the Endpoints object (that is, joins Services & Pods).
- Service Account & Token Controllers: Create default accounts and API access tokens for new namespaces.
kube-scheduler
kube-scheduler watches newly created pods that have no node assigned, and selects a node for them to run on.
Kubernetes worker node components
Node components run on every node, maintaining running pods and providing the Kubernetes runtime environment.
kubelet
kubelet is the primary node agent. It watches for pods that have been assigned to its node (either by apiserver or via local configuration file) and:
- Mounts the pod’s required volumes.
- Downloads the pod’s secrets.
- Runs the pod’s containers via docker .
- Periodically executes any requested container liveness probes.
- Reports the status of the pod back to the rest of the system, by creating a mirror pod if necessary.
- Reports the status of the node back to the rest of the system.
kube-proxy
kube-proxy enables the Kubernetes service abstraction by maintaining network rules on the host and performing connection forwarding.
docker
docker is used for running containers.
To learn more about kubernetes concepts you can visit Kubernetes concepts
Source : kubernetes.io
Calico for Networking
Calico provides simple, scalable and secure virtual networking. Calico uses BGP to distribute routes for every Kubernetes pod, which allows it to seamlessly integrate your Kubernetes cluster with existing data center infrastructure without the need for overlays.
Calico Components
Calico is made up of the following interdependent components:
- Felix, the primary Calico agent that runs on each machine that hosts endpoints.
- The Orchestrator plugin, orchestrator-specific code that tightly integrates Calico into that orchestrator.
- etcd, the data store.
- BIRD, a BGP client that distributes routing information.
- BGP Route Reflector (BIRD), an optional BGP route reflector for higher scale.
Learn more about Calico for Kubernetes
Source : kubernetes.io
Kubernetes Cluster Configuration
Kubernetes master nodes
We will use TLS to secure our kubernetes servers. Any client (kubelet , API etc) that need to interact with Kubernetes API servers will have to present valid certs and to enable TLS we need to generate certs.
Generating TLS certs
We will use CloudFlare’s PKI toolkit to generate certs . Install below packages on any of kubernetes master server
apt-get update
wget https://pkg.cfssl.org/R1.2/cfssljson_linux-amd64
chmod +x cfssljson_linux-amd64
sudo mv cfssljson_linux-amd64 /usr/local/bin/cfssljson
wget https://pkg.cfssl.org/R1.2/cfssl_linux-amd64
chmod +x cfssl_linux-amd64
sudo mv cfssl_linux-amd64 /usr/local/bin/cfssl
Generating CA, Server and Client Certs and Keys
echo '{
 "signing": {
 "default": {
 "expiry": "8760h"
 },
 "profiles": {
 "kubernetes": {
 "usages": ["signing", "key encipherment", "server auth", "client auth"],
 "expiry": "8760h"
 }
 }
 }
}' > ca-config.json

cat > ca-csr.json < kubernetes-csr.json <
I have created one certificate and key which includes all the nodes however separate cert can be generated for each node.
Bring up etcd cluster (Replicated etcd Cluster)
Perform below steps on all 3 etcd nodes
wget https://github.com/coreos/etcd/releases/download/v3.2.7/etcd-v3.2.7-linux-amd64.tar.gz

tar -xvf etcd-v3.2.7-linux-amd64.tar.gz

sudo mv etcd-v3.2.7-linux-amd64/etcd* /usr/local/bin/

sudo mkdir -p  /var/lib/etcd
Create a unit service for etcd
cat > etcd.service <[Unit]
Description=etcd
Documentation=https://github.com/coreos

[Service]
ExecStart=/usr/local/bin/etcd \
  --name kube-etcd-3.scaleon.io \
  --initial-advertise-peer-urls http://172.16.10.61:2380 \
  --listen-peer-urls http://172.16.10.61:2380 \
  --listen-client-urls http://172.16.10.61:2379,http://127.0.0.1:2379 \
  --advertise-client-urls http://172.16.10.61:2379 \
  --initial-cluster-token etcd-kubernetes-0 \
  --initial-cluster kube-etcd-1.scaleon.io=http://172.16.10.59:2380,kube-etcd-2.scaleon.io=http://172.16.10.60:2380,kube-etcd-3.scaleon.io=http://172.16.10.61:2380 \
  --initial-cluster-state new \
  --data-dir=/var/lib/etcd
Restart=on-failure
RestartSec=5

[Install]
WantedBy=multi-user.target
EOF

sudo mv etcd.service /etc/systemd/system/
sudo systemctl daemon-reload
sudo systemctl enable etcd
sudo systemctl start etcd
After configuring all 3 etcd nodes check the status of etcd cluster
[centos@kube-etcd-3 ~]$ ETCDCTL_API=3 etcdctl member list
510d1a533d247dbc, started, kube-etcd-2.scaleon.io, http://172.16.10.60:2380, http://172.16.10.60:2379
e14418331a64393a, started, kube-etcd-1.scaleon.io, http://172.16.10.59:2380, http://172.16.10.59:2379
e94c26d193aefefe, started, kube-etcd-3.scaleon.io, http://172.16.10.61:2380, http://172.16.10.61:2379
Bring up Kubernetes master nodes (Replicated API Cluster)
Generating Token file for token authentication between kube-apiserver and kubelet/kube-proxy
AuthToken=$(cat /dev/urandom | tr -dc 'a-zA-Z0-9' | fold -w 64 | head -n 1)
APIToken=$(cat /dev/urandom | tr -dc 'a-zA-Z0-9' | fold -w 64 | head -n 1)

cat > token.csv <<EOF
$adminToken,admin,admin,"cluster-admin,system:masters"
$kubeletToken,kubelet,kubelet,"cluster-admin,system:masters"
EOF

sudo mv token.csv /var/lib/kubernetes
Generate Kubeconfig
cat > /var/lib/kubelet/kubeconfig <<EOF
apiVersion: v1
kind: Config
clusters:
- cluster:
    certificate-authority: /var/lib/kubernetes/ca.pem
    server: https://172.16.10.62:6443
  name: kubernetes
contexts:
- context:
    cluster: kubernetes
    user: kubelet
  name: kubelet
current-context: kubelet
users:
- name: kubelet
  user:
    token: G6dmycMvz8FM0ZvJbTj6lnzFT9sUfr6PEFY3WugY0Am5eKOsNrlP1yd8BFFxKuA9
EOF
Install Docker on all the 3 master nodes
wget https://get.docker.com/builds/Linux/x86_64/docker-17.05.0-ce.tgz
tar -xvf docker-17.05.0-ce.tgz
sudo cp docker/docker* /usr/bin/

cat > /etc/systemd/system/docker.service <<EOF
[Unit]
Description=Docker Application Container Engine
Documentation=http://docs.docker.io
[Service]
ExecStart=/usr/bin/docker daemon   --iptables=false   --ip-masq=false   --host=unix:///var/run/docker.sock   --log-level=error   --storage-driver=overlay2
Restart=on-failure
RestartSec=5
[Install]
WantedBy=multi-user.target
EOF
Download and install kubernetes binaries
wget https://storage.googleapis.com/kubernetes-release/release/v1.7.4/bin/linux/amd64/kube-apiserver
wget https://storage.googleapis.com/kubernetes-release/release/v1.7.4/bin/linux/amd64/kube-controller-manager
wget https://storage.googleapis.com/kubernetes-release/release/v1.7.4/bin/linux/amd64/kube-scheduler
wget https://storage.googleapis.com/kubernetes-release/release/v1.7.4/bin/linux/amd64/kubectl

chmod +x kube-apiserver kube-controller-manager kube-scheduler kubectl
sudo mv kube-apiserver kube-controller-manager kube-scheduler kubectl /usr/bin/
Create Unit service
cat > /etc/systemd/system/kube-apiserver.service <<EOF
[Unit]
Description=Kubernetes API Server
Documentation=https://github.com/GoogleCloudPlatform/kubernetes
[Service]
ExecStart=/usr/bin/kube-apiserver   --admission-control=NamespaceLifecycle,LimitRanger,SecurityContextDeny,ServiceAccount,ResourceQuota   --advertise-address=172.16.10.62   --allow-privileged=true   --apiserver-count=1   --authorization-mode=RBAC   --bind-address=0.0.0.0   --enable-swagger-ui=true   --insecure-port=8080   --secure-port=6443   --insecure-bind-address=0.0.0.0   --kubelet-certificate-authority=/var/lib/kubernetes/ca.pem   --etcd-servers=http://172.16.10.59:2379,http://172.16.10.60:2379,http://172.16.10.61:2379   --service-account-key-file=/var/lib/kubernetes/ca-key.pem   --service-cluster-ip-range=10.20.0.0/16   --service-node-port-range=30000-32767   --tls-cert-file=/var/lib/kubernetes/kubernetes.pem   --tls-private-key-file=/var/lib/kubernetes/kubernetes-key.pem   --token-auth-file=/var/lib/kubernetes/token.csv   --v=2
Restart=on-failure
RestartSec=5
[Install]
WantedBy=multi-user.target
EOF


cat > /etc/systemd/system/kube-controller-manager.service <<EOF
[Unit]
Description=Kubernetes Controller Manager
Documentation=https://github.com/GoogleCloudPlatform/kubernetes
[Service]
ExecStart=/usr/bin/kube-controller-manager   --cluster-name=kubernetes   --leader-elect=true   --master=http://172.16.10.62:8080   --root-ca-file=/var/lib/kubernetes/ca.pem   --service-cluster-ip-range=10.20.0.0/16   --pod-eviction-timeout 30s   --service-account-private-key-file=/var/lib/kubernetes/ca-key.pem   --cluster-name=kubernetes   --cluster-signing-cert-file=/var/lib/kubernetes/ca.pem   --cluster-signing-key-file=/var/lib/kubernetes/ca-key.pem   --service-cluster-ip-range=10.20.0.0/16   --v=2
Restart=on-failure
RestartSec=5
[Install]
WantedBy=multi-user.target
EOF

cat > /etc/systemd/system/kube-scheduler.service <<EOF
[Unit]
Description=Kubernetes Scheduler
Documentation=https://github.com/GoogleCloudPlatform/kubernetes
[Service]
ExecStart=/usr/bin/kube-scheduler   --leader-elect=true   --master=http://172.16.10.62:8080   --v=2
Restart=on-failure
RestartSec=5
[Install]
WantedBy=multi-user.target
EOF
Verification
ubuntu@kube-apiserver-1:~$ kubectl get cs
NAME                 STATUS    MESSAGE              ERROR
controller-manager   Healthy   ok
scheduler            Healthy   ok
etcd-2               Healthy   {"health": "true"}
etcd-1               Healthy   {"health": "true"}
etcd-0               Healthy   {"health": "true"}

ubuntu@kube-apiserver-1:~$ kubectl cluster-info
Kubernetes master is running at http://localhost:8080
To further debug and diagnose cluster problems, use 'kubectl cluster-info dump'.
ubuntu@kube-apiserver-1:~$
Copy the certs to all other master nodes and run the above commands on them to bring them in replicated API cluster
Run on the master node where certs were generated
sudo scp -i cloud1.pem -o StrictHostKeyChecking=no ca.pem kubernetes-key.pem kubernetes.pem ca-key.pem ubuntu@kube-apiserver-2:/home/ubuntu
sudo scp -i cloud1.pem -o StrictHostKeyChecking=no /var/lib/kubernetes/token.csv   ubuntu@kube-apiserver-2:/home/ubuntu
sudo scp -i cloud1.pem -o StrictHostKeyChecking=no ca.pem kubernetes-key.pem kubernetes.pem ca-key.pem ubuntu@kube-apiserver-3:/home/ubuntu
sudo scp -i cloud1.pem -o StrictHostKeyChecking=no /var/lib/kubernetes/token.csv   ubuntu@kube-apiserver-3:/home/ubuntu

Run on kube-apiserver-2 and kube-apiserver-2

sudo cp ca.pem kubernetes-key.pem kubernetes.pem ca-key.pem /var/lib/kubernetes/
sudo mv token.csv /var/lib/kubernetes/
Bring up Kubernetes worker nodes
Copy the certs and kubeconfig from API server to all the worker nodes
First make required directories on all the worker nodes.
Run on worker nodes
sudo mkdir -p \
/etc/cni/net.d \
/opt/cni/bin \
/var/lib/kubelet \
/var/lib/kube-proxy \
/var/lib/kubernetes \
/var/run/kubernetes
Download and install Kubernetes, Docker & Calico on worker nodes
wget https://get.docker.com/builds/Linux/x86_64/docker-17.05.0-ce.tgz
tar -xvf docker-17.05.0-ce.tgz
sudo cp docker/docker* /usr/bin/

cat > /etc/systemd/system/docker.service <<EOF
[Unit]
Description=Docker Application Container Engine
Documentation=http://docs.docker.io
[Service]
ExecStart=/usr/bin/docker daemon   --iptables=false   --ip-masq=false   --host=unix:///var/run/docker.sock   --log-level=error   --storage-driver=overlay2
Restart=on-failure
RestartSec=5
[Install]
WantedBy=multi-user.target
EOF

wget https://github.com/containernetworking/cni/releases/download/v0.5.2/cni-amd64-v0.5.2.tgz
sudo tar -xvf cni-amd64-v0.5.2.tgz -C /etc/cni/net.d

wget https://github.com/projectcalico/calicoctl/releases/download/v1.3.0/calicoctl

chmod +x calicoctl
sudo mv calicoctl /usr/local/bin

wget https://github.com/projectcalico/cni-plugin/releases/download/v1.10.0/calico
wget https://github.com/projectcalico/cni-plugin/releases/download/v1.10.0/calico-ipam

chmod +x calico calico-ipam
sudo mv calico /etc/cni/net.d
sudo mv calico-ipam /etc/cni/net.d


wget https://storage.googleapis.com/kubernetes-release/release/v1.7.4/bin/linux/amd64/kubelet
wget https://storage.googleapis.com/kubernetes-release/release/v1.7.4/bin/linux/amd64/kube-proxy


chmod +x  kube-proxy kubelet
sudo mv kube-proxy kubelet /usr/bin/
Run on the master node where certs were generated to copy the certs to worker nodes
sudo scp -i cloud1.pem -o StrictHostKeyChecking=no /var/lib/kubelet/kubeconfig  ubuntu@kube-worker-3:/home/ubuntu
sudo scp -i cloud1.pem -o StrictHostKeyChecking=no ca.pem kubernetes-key.pem kubernetes.pem ca-key.pem ubuntu@kube-worker-3:/home/ubuntu
sudo scp -i cloud1.pem -o StrictHostKeyChecking=no /var/lib/kubernetes/token.csv   ubuntu@kube-worker-3:/home/ubuntu
sudo scp -i cloud1.pem -o StrictHostKeyChecking=no /var/lib/kubelet/kubeconfig  ubuntu@kube-worker-2:/home/ubuntu
sudo scp -i cloud1.pem -o StrictHostKeyChecking=no ca.pem kubernetes-key.pem kubernetes.pem ca-key.pem ubuntu@kube-worker-2:/home/ubuntu
sudo scp -i cloud1.pem -o StrictHostKeyChecking=no /var/lib/kubernetes/token.csv   ubuntu@kube-worker-2:/home/ubuntu
sudo scp -i cloud1.pem -o StrictHostKeyChecking=no /var/lib/kubelet/kubeconfig  ubuntu@kube-worker-1:/home/ubuntu
sudo scp -i cloud1.pem -o StrictHostKeyChecking=no ca.pem kubernetes-key.pem kubernetes.pem ca-key.pem ubuntu@kube-worker-1:/home/ubuntu
sudo scp -i cloud1.pem -o StrictHostKeyChecking=no /var/lib/kubernetes/token.csv   ubuntu@kube-worker-1:/home/ubuntu
Run on worker nodes
sudo cp ca.pem kubernetes-key.pem kubernetes.pem ca-key.pem /var/lib/kubernetes/
sudo mv kubeconfig /var/lib/kubelet/
Calico Networking
Calico creates a container on each worker node which talks to kubelet to gather information about all the pods created on that node. Calico integrates with kubelet with Container Network Interface (CNI) using Calico’s CNI pugin . Calico also has IPAM which allocate IP addresses to all the pods . Before Calico can allocate IP addresses we need to create IP pool where we define the POD CIDR . Calico uses BGP between all the worker nodes to all communication between PODs running on any worked node.
Run below commands on all the worker nodes which will download the respective binaries and create Unit service for each of them. Below services will be installed.
cat > /etc/systemd/system/kubelet.service <<EOF
[Unit]
Description=Kubernetes Kubelet
Documentation=https://github.com/GoogleCloudPlatform/kubernetes
After=docker.service
Requires=docker.service
[Service]
ExecStart=/usr/bin/kubelet   --allow-privileged=true   --cloud-provider=   --cluster-dns=10.20.0.10   --cluster-domain=cluster.local   --container-runtime=docker   --docker=unix:///var/run/docker.sock   --network-plugin=cni   --network-plugin-dir=/etc/cni/net.d   --kubeconfig=/var/lib/kubelet/kubeconfig   --serialize-image-pulls=false   --tls-cert-file=/var/lib/kubernetes/kubernetes.pem   --tls-private-key-file=/var/lib/kubernetes/kubernetes-key.pem   --api-servers=https://172.16.10.99:443   --v=2
Restart=on-failure
RestartSec=5
[Install]
WantedBy=multi-user.target
EOF

cat > /etc/systemd/system/kube-proxy.service <<EOF
[Unit]
Description=Kubernetes Kube Proxy
Documentation=https://github.com/GoogleCloudPlatform/kubernetes
[Service]
ExecStart=/usr/bin/kube-proxy   --master=https://172.16.10.99:443   --kubeconfig=/var/lib/kubelet/kubeconfig   --proxy-mode=iptables   --v=2
Restart=on-failure
RestartSec=5
[Install]
WantedBy=multi-user.target
EOF


cat > /etc/systemd/system/calico.service <<EOF
[Unit]
Description=calico node
After=docker.service
Requires=docker.service
[Service]
User=root
PermissionsStartOnly=true
Environment=ETCD_ENDPOINTS=http://172.16.10.59:2379,http://172.16.10.60:2379,http://172.16.10.61:2379
ExecStart=/usr/bin/docker run --net=host --privileged --name=calico-node --rm -e CALICO_NETWORKING_BACKEND=bird    -e CALICO_LIBNETWORK_ENABLED=true -e CALICO_LIBNETWORK_IFPREFIX=cali    -e ETCD_AUTHORITY= -e ETCD_SCHEME=    -e IP=172.16.10.65   -e NO_DEFAULT_POOLS= -e CALICO_LIBNETWORK_ENABLED=true    -e ETCD_ENDPOINTS=http://172.16.10.59:2379,http://172.16.10.60:2379,http://172.16.10.61:2379    -v /var/lib/kubernetes/ca.pem:/etc/calico/certs/ca_cert.crt    -e NODENAME=kube-worker-1 -e CALICO_NETWORKING_BACKEND=bird    -v /var/run/calico:/var/run/calico -v /lib/modules:/lib/modules -v /var/log/calico:/var/log/calico    -v /run/docker/plugins:/run/docker/plugins -v /var/run/docker.sock:/var/run/docker.sock    calico/node:latest
ExecStop=/usr/bin/docker rm -f calico-node
Restart=always
RestartSec=10
[Install]
WantedBy=multi-user.target
EOF

cat > /etc/cni/net.d/10-calico.conf <<EOF
{
    "name": "calico-k8s-network",
    "type": "calico",
    "etcd_endpoints": "http://172.16.10.59:2379,http://172.16.10.60:2379,http://172.16.10.61:2379",
    "ipam": {
        "type": "calico-ipam",
        "assign_ipv4": "true",
        "assign_ipv6": "false"
    },
    "policy": {
        "type": "k8s"
    },
    "kubernetes": {
        "kubeconfig": "/var/lib/kubelet/kubeconfig"
    }
}


sudo systemctl daemon-reload
sudo systemctl enable kubelet
sudo systemctl start kubelet
sudo systemctl enable kube-proxy
sudo systemctl start kube-proxy
sudo systemctl enable calico
sudo systemctl start calico
Calico uses Policy Controller to push Network policies. This policy controller runs a container and listen to kubernetes API transactions to determine the Pods and their information.This doesn’t have to run on all the worker nodes unlike Calico node container which runs on all the worker nodes.
Use below yaml file to create the Calico Policy controller. We have RBAC enabled on the cluster so we need to create cluster roles. Run below on any master node.
cat <<EOF | kubectl create -f -

	# Create this manifest using kubectl to deploy
	# the Calico policy controller on Kubernetes.
	# It deploys a single instance of the policy controller.
	apiVersion: extensions/v1beta1
	kind: Deployment
	metadata:
	  name: calico-policy-controller
	  namespace: kube-system
	  labels:
	    k8s-app: calico-policy
	spec:
	  # Only a single instance of the policy controller should be
	  # active at a time.  Since this pod is run as a Deployment,
	  # Kubernetes will ensure the pod is recreated in case of failure,
	  # removing the need for passive backups.
	  replicas: 1
	  strategy:
	    type: Recreate
	  template:
	    metadata:
	      name: calico-policy-controller
	      namespace: kube-system
	      labels:
	        k8s-app: calico-policy
	    spec:
	      hostNetwork: true
	      containers:
	        - name: calico-policy-controller
	          # Make sure to pin this to your desired version.
	          image: calico/kube-policy-controller:v0.7.0
	          env:
	            # Configure the policy controller with the location of
	            # your etcd cluster.
	            - name: ETCD_ENDPOINTS
	              value: "http://172.16.10.59:2379,http://172.16.10.60:2379,http://172.16.10.61:2379"
	            # Location of the Kubernetes API - this shouldn't need to be
	            # changed so long as it is used in conjunction with
	            # CONFIGURE_ETC_HOSTS="true".
	            - name: K8S_API
	              value: "http://172.16.10.99:6443"
	            # Configure /etc/hosts within the container to resolve
	            # the kubernetes.default Service to the correct clusterIP
	            # using the environment provided by the kubelet.
	            # This removes the need for KubeDNS to resolve the Service.
	            - name: CONFIGURE_ETC_HOSTS
	              value: "false"
	            - name: ETCD_CA_CERT_FILE
	              value: “etcd-ca”
	          volumeMounts:
	          - name: etcd-ca
	            mountPath: /calico-secrets
	      volumes:
	      - name: etcd-ca
	        hostPath:
	          path: /calico-secrets

	---
	kind: ClusterRole
	apiVersion: rbac.authorization.k8s.io/v1beta1
	metadata:
	  name: calico-policy-controller
	  namespace: kube-system
	rules:
	  - apiGroups:
	    - ""
	    - extensions
	    resources:
	      - pods
	      - namespaces
	      - networkpolicies
	    verbs:
	      - watch
	      - list
	---
	kind: ClusterRoleBinding
	apiVersion: rbac.authorization.k8s.io/v1beta1
	metadata:
	  name: calico-policy-controller
	roleRef:
	  apiGroup: rbac.authorization.k8s.io
	  kind: ClusterRole
	  name: calico-policy-controller
	subjects:
	- kind: ServiceAccount
	  name: calico-policy-controller
	  namespace: kube-system
	---
	kind: ClusterRole
	apiVersion: rbac.authorization.k8s.io/v1beta1
	metadata:
	  name: calico-node
	  namespace: kube-system
	rules:
	  - apiGroups: [""]
	    resources:
	      - pods
	      - nodes
	    verbs:
	      - get
	---
	apiVersion: rbac.authorization.k8s.io/v1beta1
	kind: ClusterRoleBinding
	metadata:
	  name: calico-node
	roleRef:
	  apiGroup: rbac.authorization.k8s.io
	  kind: ClusterRole
	  name: calico-node
	subjects:
	- kind: ServiceAccount
	  name: calico-node
	  namespace: kube-system

	EOF
Create IP Pool for POD CIDR using Calicoctl.
Run this below from any of the worker nodes or where calicoctl is installed
export ETCD_ENDPOINTS=http://172.16.10.59:2379
cat <<EOF | calicoctl create -f -
	- apiVersion: v1
	  kind: ipPool
	  metadata:
	    cidr: 172.200.0.0/16
	  spec:
	    ipip:
	      enabled: true
	      mode: always
	    nat-outgoing: true
	EOF
Verification
ubuntu@kube-apiserver-1:~$ kubectl get cs

NAME                 STATUS    MESSAGE              ERROR
controller-manager   Healthy   ok
scheduler            Healthy   ok
etcd-0               Healthy   {"health": "true"}
etcd-1               Healthy   {"health": "true"}
etcd-2               Healthy   {"health": "true"}

ubuntu@kube-apiserver-1:~$ kubectl get nodes
NAME            STATUS    AGE       VERSION
kube-worker-1   Ready     1h        v1.7.4
kube-worker-2   Ready     1h        v1.7.4
kube-worker-3   Ready     1h        v1.7.4
ubuntu@kube-apiserver-1:~$


export ETCD_ENDPOINTS=http://172.16.10.59

ubuntu@kube-worker-2:~$ sudo calicoctl node status
Calico process is running.
IPv4 BGP status
+--------------+-------------------+-------+----------+--------------------------------+
| PEER ADDRESS | PEER TYPE | STATE | SINCE | INFO     |                                |
+--------------+-------------------+-------+----------+--------------------------------+
| 172.16.10.65 | node-to-node mesh | up    | 16:08:04 | Established                    |
| 172.16.10.67 | node-to-node mesh | up    | 16:27:34 | Established                    |
+--------------+-------------------+-------+----------+--------------------------------+
IPv6 BGP status
No IPv6 peers found.
You can see above on worker-2 it has BGP up with 2 other worker nodes .
ubuntu@kube-worker-2:~$ sudo calicoctl get ippool
CIDR
172.200.0.0/16
fd80:24e2:f998:72d6::/64
We can see below calico-node & calico-policy container docker containers have started and in running state.
ubuntu@kube-worker-2:~$ sudo docker ps
CONTAINER ID        IMAGE                                      COMMAND              CREATED             STATUS              PORTS               NAMES
d5a1613f2e5c        calico/kube-policy-controller              "/dist/controller"   2 hours ago         Up 2 hours                              k8s_calico-policy-controller_calico-policy-controller-3410954945-5wdtq_kube-system_0869b7d5-9d58-11e7-9a54-fa163e14fef9_0
2c8f7f69e3a9        gcr.io/google_containers/pause-amd64:3.0   "/pause"             2 hours ago         Up 2 hours                              k8s_POD_calico-policy-controller-3410954945-5wdtq_kube-system_0869b7d5-9d58-11e7-9a54-fa163e14fef9_0
febb830b12b7        calico/node:latest                         "start_runit"        2 hours ago         Up 2 hours                              calico-node
ubuntu@kube-worker-2:~$


ubuntu@kube-apiserver-1:~$ kubectl get pods
No resources found.

ubuntu@kube-apiserver-1:~$ kubectl get pods -n kube-system
NAME                                        READY     STATUS    RESTARTS   AGE
calico-policy-controller-3410954945-5wdtq   1/1       Running   0          1h
ubuntu@kube-apiserver-1:~$
Lets create Pods
To learn more about Kuberenetes and how applications are deployed and accessed please refer Kubernetes Concepts
Lets spin up a nginx container and create a service to expose container port via NodePort. I will create 3 containers so that each worker node gets one container and this way we will validate that all 3 workers are operational.
ubuntu@kube-apiserver-1:~$ kubectl run nginx --image=nginx --replicas=3 --port=80
deployment "nginx" created

ubuntu@kube-apiserver-1:~$ kubectl expose deployment nginx --port=80 --type=NodePort
service "nginx" exposed

ubuntu@kube-apiserver-1:~$ kubectl get pods
NAME                     READY     STATUS    RESTARTS   AGE
nginx-1423793266-0mbq9   1/1       Running   0          7m
nginx-1423793266-58mq2   1/1       Running   0          7m
nginx-1423793266-gc7cg   1/1       Running   0          7m


ubuntu@kube-apiserver-1:~$ kubectl get pods -o wide
NAME                     READY     STATUS    RESTARTS   AGE       IP               NODE
nginx-1423793266-0mbq9   1/1       Running   0          7m        172.200.127.13   kube-worker-2
nginx-1423793266-58mq2   1/1       Running   0          7m        172.200.20.138   kube-worker-3
nginx-1423793266-gc7cg   1/1       Running   0          7m        172.200.180.13   kube-worker-1


ubuntu@kube-apiserver-1:~$ kubectl get svc
NAME         CLUSTER-IP    EXTERNAL-IP   PORT(S)        AGE
kubernetes   10.20.0.1             443/TCP        23h
nginx        10.20.178.2          80:30830/TCP   6m
ubuntu@kube-apiserver-1:~$
We can see that nginx service has been exposed via NodePort 30830 which maps to container port 80 . Now with kube-proxy this nginx container can be accessed from any worker node with the exposed NodePort. Lets access via browser

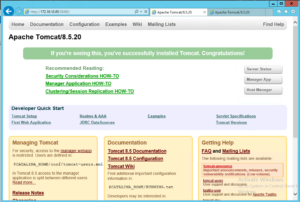
Lets create another Pod this time we will create tomcat container
ubuntu@kube-apiserver-1:~$ kubectl run tomcat --image=tomcat --replicas=3 --port=8080
deployment "tomcat" created

ubuntu@kube-apiserver-1:~$ kubectl expose deployment tomcat --port=8080 --type=NodePort
service "tomcat" exposed

ubuntu@kube-apiserver-1:~$ kubectl get pods
NAME                      READY     STATUS    RESTARTS   AGE
nginx-1423793266-0mbq9    1/1       Running   0          16m
nginx-1423793266-58mq2    1/1       Running   0          16m
nginx-1423793266-gc7cg    1/1       Running   0          16m
tomcat-1605005858-28m4n   1/1       Running   0          15s
tomcat-1605005858-6vlf0   1/1       Running   0          15s
tomcat-1605005858-tmr8l   1/1       Running   0          15s

ubuntu@kube-apiserver-1:~$ kubectl get pods -o wide
NAME                      READY     STATUS    RESTARTS   AGE       IP               NODE
nginx-1423793266-0mbq9    1/1       Running   0          16m       172.200.127.13   kube-worker-2
nginx-1423793266-58mq2    1/1       Running   0          16m       172.200.20.138   kube-worker-3
nginx-1423793266-gc7cg    1/1       Running   0          16m       172.200.180.13   kube-worker-1
tomcat-1605005858-28m4n   1/1       Running   0          19s       172.200.20.139   kube-worker-3
tomcat-1605005858-6vlf0   1/1       Running   0          19s       172.200.180.14   kube-worker-1
tomcat-1605005858-tmr8l   1/1       Running   0          19s       172.200.127.14   kube-worker-2


ubuntu@kube-apiserver-1:~$ kubectl get svc
NAME         CLUSTER-IP     EXTERNAL-IP   PORT(S)          AGE
kubernetes   10.20.0.1              443/TCP          23h
nginx        10.20.178.2           80:30830/TCP     15m
tomcat       10.20.83.150          8080:30460/TCP   27s
ubuntu@kube-apiserver-1:~$
We can see 3 tomcat pods are running one on each worker node and this time container Port is 8080 which exposed via NodePort on 30460. Lets access via browser
Note : I have used Loadbalancer running on openstack to frontend Kubernetes API to handle all the client requests.
ubuntu@kube-apiserver-1:~$ curl -v --cacert ca.pem https://172.16.10.99:443/version
*   Trying 172.16.10.99...
* Connected to 172.16.10.99 (172.16.10.99) port 443 (#0)
> GET /version HTTP/1.1
> Host: 172.16.10.99
> User-Agent: curl/7.47.0
> Accept: */*
>
< HTTP/1.1 200 OK
< Content-Type: application/json
< Date: Tue, 19 Sep 2017 19:12:41 GMT
< Content-Length: 260
<
{
  "major": "1",
  "minor": "7",
  "gitVersion": "v1.7.4",
  "gitCommit": "793658f2d7ca7f064d2bdf606519f9fe1229c381",
  "gitTreeState": "clean",
  "buildDate": "2017-08-17T08:30:51Z",
  "goVersion": "go1.8.3",
  "compiler": "gc"
  "platform": "linux/amd64"
* Connection #0 to host 172.16.10.99 left intact
[root@controller0 ~(keystone_admin)]# neutron lbaas-loadbalancer-list
+--------------------------------------+--------------+--------------+---------------------+----------+
| id | name | vip_address | provisioning_status | provider |
+--------------------------------------+--------------+--------------+---------------------+----------+
| 356199de-eebc-4e76-93b4-bbd69dc73676 | kube-api | 172.16.10.99 | ACTIVE | haproxy |
+--------------------------------------+--------------+--------------+---------------------+----------+


[root@controller0 ~(keystone_admin)]# neutron lbaas-listener-list
+--------------------------------------+--------------------------------------+----------------+----------+---------------+----------------+
| id | default_pool_id | name | protocol | protocol_port | admin_state_up |
+--------------------------------------+--------------------------------------+----------------+----------+---------------+----------------+
| 9e8f800f-91f3-40b5-83cd-294d443ac961 | 3ae06a3f-3b20-4f9b-8fed-bacc220e6512 | kube-api-https | HTTPS | 443 | True |
+--------------------------------------+--------------------------------------+----------------+----------+---------------+----------------+


[root@controller0 ~(keystone_admin)]# neutron lbaas-pool-list
+--------------------------------------+---------------------+----------+----------------+
| id | name | protocol | admin_state_up |
+--------------------------------------+---------------------+----------+----------------+
| 3ae06a3f-3b20-4f9b-8fed-bacc220e6512 | kube-api-pool-https | HTTPS | True |
+--------------------------------------+---------------------+----------+----------------+


[root@controller0 ~(keystone_admin)]# neutron lbaas-member-list kube-api-pool-https
+--------------------------------------+------+--------------+---------------+--------+--------------------------------------+----------------+
| id | name | address | protocol_port | weight | subnet_id | admin_state_up |
+--------------------------------------+------+--------------+---------------+--------+--------------------------------------+----------------+
| 0b2c5f2d-4a6d-464c-a94f-e8e4ed542533 | | 172.16.10.62 | 6443 | 1 | 96c48212-7798-41fe-bc57-21e7e7b93dca | True |
| c544d808-c13c-4b1c-95ac-f4f5d315a322 | | 172.16.10.63 | 6443 | 1 | 96c48212-7798-41fe-bc57-21e7e7b93dca | True |
| cd337595-e085-4779-b317-03200cbc419b | | 172.16.10.64 | 6443 | 1 | 96c48212-7798-41fe-bc57-21e7e7b93dca | True |
+--------------------------------------+------+--------------+---------------+--------+--------------------------------------+----------------+
Drop a note if you run into any issues..
