
Enhancing Security and Streamlining User Management for AWS Transfer Server
By Sakshi Zalavadia, Piyush Jalan / Apr 03, 2024
Table of Contents
Introduction
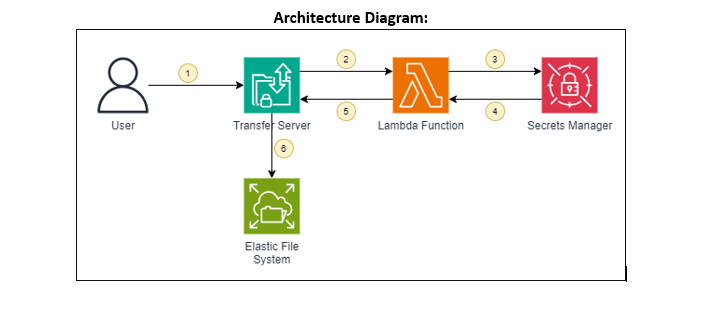
In today's digital world, secure and efficient file transfers are crucial for businesses of all sizes. AWS Transfer Family offers a managed solution for transferring files directly into and out of Amazon S3 and EFS storage using secure protocols like SFTP and FTPS. With AWS Transfer Server, you gain a fully managed file transfer endpoint without the hassle of managing your own server infrastructure. However, standard password authentication can leave vulnerabilities and require constant management. But wait, how do you make sure they're not falling into the wrong hands? Enter the superheroes of this tale: AWS Lambda functions and Secrets Manager!
By integrating a custom identity provider function built with Lambda, you can significantly enhance security and simplify user management. You'll no longer need to store passwords directly on the Transfer Server, eliminating the risk of unauthorized access and simplifying password complexity requirements. Secrets Manager acts as your secure vault, storing sensitive credentials like usernames and passwords. This ensures your credentials are never exposed in plain text, adding another layer of protection. Finally, EFS provides persistent storage for your files, ensuring they're readily available and accessible even after restarts.
Ready to unlock a secure and efficient file transfer experience with enhanced password management? Follow along as we explore the powerful combination of AWS Transfer Server, Lambda, Secrets Manager, and EFS.
Follow Along Steps
-
Creating a Lambda Function – The Gatekeeper:
Begin by creating a Lambda function. Choose the Python 3.11 runtime and a basic Lambda execution role. This role will allow the Lambda function to perform its assigned tasks.
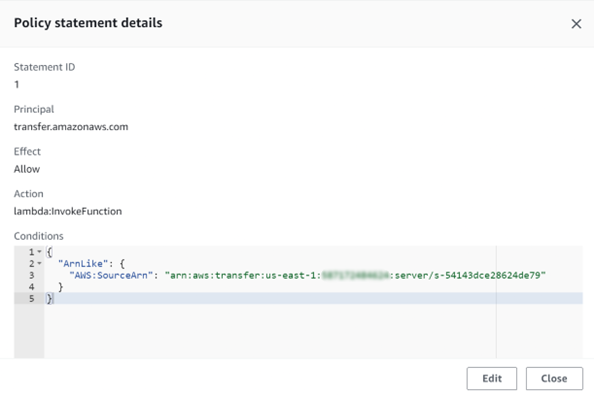
Attach a resource-based policy statement to your Lambda function. The provided policy grants the function access to the specified Transfer Server:
SourceArn: “arn:aws:transfer:us-east-1:<account-no>:server/<server-id>"
Replace <account-no> with your AWS account number and <server-id> with the ID of your Transfer Server (We'll create this later).
Now comes the magic! Add Python code to your Lambda function. This code will act as the custom identity provider for your Transfer Server. Its responsibility is to:
- Receive username and password provided by the user attempting to access the server.
- Retrieve the secret stored in Secrets Manager for the specific Transfer Server.
- Compare the provided credentials with the retrieved secret.
- Grant access if the credentials match, denying access otherwise.
Python Code for Lambda function:
import osimport jsonimport boto3import base64from ipaddress import ip_network, ip_addressfrom botocore.exceptions import ClientErrordef lambda_handler(event, context):required_param_list = ["serverId", "username", "protocol"]for parameter in required_param_list:if parameter not in event:print("Incoming " + parameter + " missing - Unexpected")return {}input_serverId = event["serverId"]input_username = event["username"]input_protocol = event["protocol"]input_password = event.get("password", "")print("ServerId: {}, Username: {}, Protocol: {}".format(input_serverId, input_username, input_protocol))print("Start User Authentication Flow")if input_password != "":print("Using PASSWORD authentication")authentication_type = "PASSWORD"else:if input_protocol == 'FTP' or input_protocol == 'FTPS':print("Empty password not allowed for FTP/S")return {}print("Using SSH authentication")authentication_type = "SSH"secret = get_secret("aws/transfer/" + input_serverId + "/" + input_username)if secret is not None:secret_dict = json.loads(secret)user_authenticated = authenticate_user(authentication_type, secret_dict, input_password, input_protocol)if user_authenticated:print("User authenticated, calling build_response with: " + authentication_type)return build_response(secret_dict, authentication_type, input_protocol)else:print("User failed authentication return empty response")return {}else:print("Secrets Manager exception thrown - Returning empty response")return {}def lookup(secret_dict, key, input_protocol):if input_protocol + key in secret_dict:print("Found protocol-specified {}".format(key))return secret_dict[input_protocol + key]else:return secret_dict.get(key, None)def authenticate_user(auth_type, secret_dict, input_password, input_protocol):if auth_type == "SSH":print("Skip password check as SSH login request")return Trueelse:password = lookup(secret_dict, "Password", input_protocol)if not password:print("Unable to authenticate user - No field match in Secret for password")return Falseif input_password == password:return Trueelse:print("Unable to authenticate user - Incoming password does not match stored")return Falsedef build_response(secret_dict, auth_type, input_protocol):response_data = {}role = lookup(secret_dict, "Role", input_protocol)if role:response_data["Role"] = roleelse:print("No field match for role - Set empty string in response")response_data["Role"] = ""posixprofile = lookup(secret_dict, "PosixProfile", input_protocol)if posixprofile:response_data["PosixProfile"] = json.loads(posixprofile)else:print("No PosixProfile - Set empty string in response")response_data["PosixProfile"] = ""policy = lookup(secret_dict, "Policy", input_protocol)if policy:response_data["Policy"] = policyhome_directory_details = lookup(secret_dict, "HomeDirectoryDetails", input_protocol)if home_directory_details:print("HomeDirectoryDetails found - Applying setting for virtual folders - ""Note: Cannot be used in conjunction with key: HomeDirectory")response_data["HomeDirectoryDetails"] = home_directory_detailsprint("Setting HomeDirectoryType to LOGICAL")response_data["HomeDirectoryType"] = "LOGICAL"home_directory = lookup(secret_dict, "HomeDirectory", input_protocol)if home_directory:print("HomeDirectory found - Note: Cannot be used in conjunction with key: HomeDirectoryDetails")response_data["HomeDirectory"] = home_directoryif auth_type == "SSH":public_key = lookup(secret_dict, "PublicKey", input_protocol)if public_key:response_data["PublicKeys"] = public_key.split(",")else:print("Unable to authenticate user - No public keys found")return {}return response_datadef get_secret(id):region = "us-east-1"print("Secrets Manager Region: " + region)print("Secret Name: " + id)client = boto3.session.Session().client(service_name="secretsmanager", region_name=region)try:resp = client.get_secret_value(SecretId=id)if "SecretString" in resp:print("Found Secret String")return resp["SecretString"]else:print("Found Binary Secret")return base64.b64decode(resp["SecretBinary"])except ClientError as err:print("Error Talking to SecretsManager: " + err.response["Error"]["Code"] + ", Message: " +err.response["Error"]["Message"])return None -
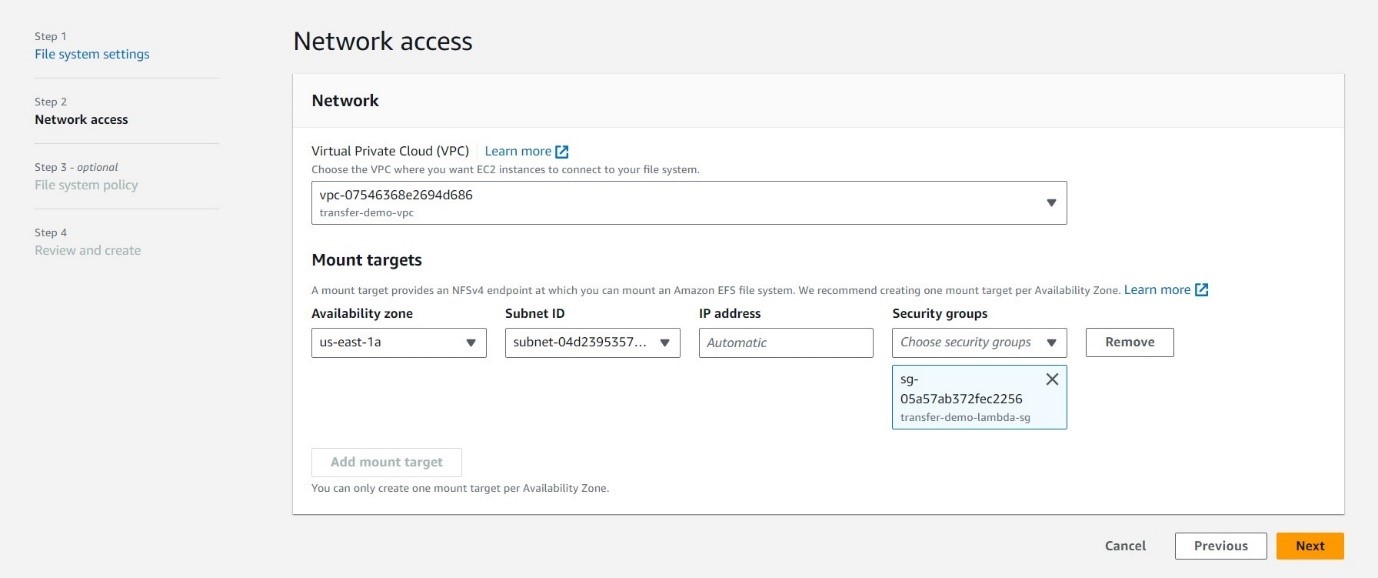
Building Your Storage Vault – Elastic File System:
EFS - Your Durable File Abode: We'll use EFS to store your files securely. Create a one-zone EFS with the configuration provided. Remember, this is where your precious files will reside, so choose the configuration wisely based on your storage needs.
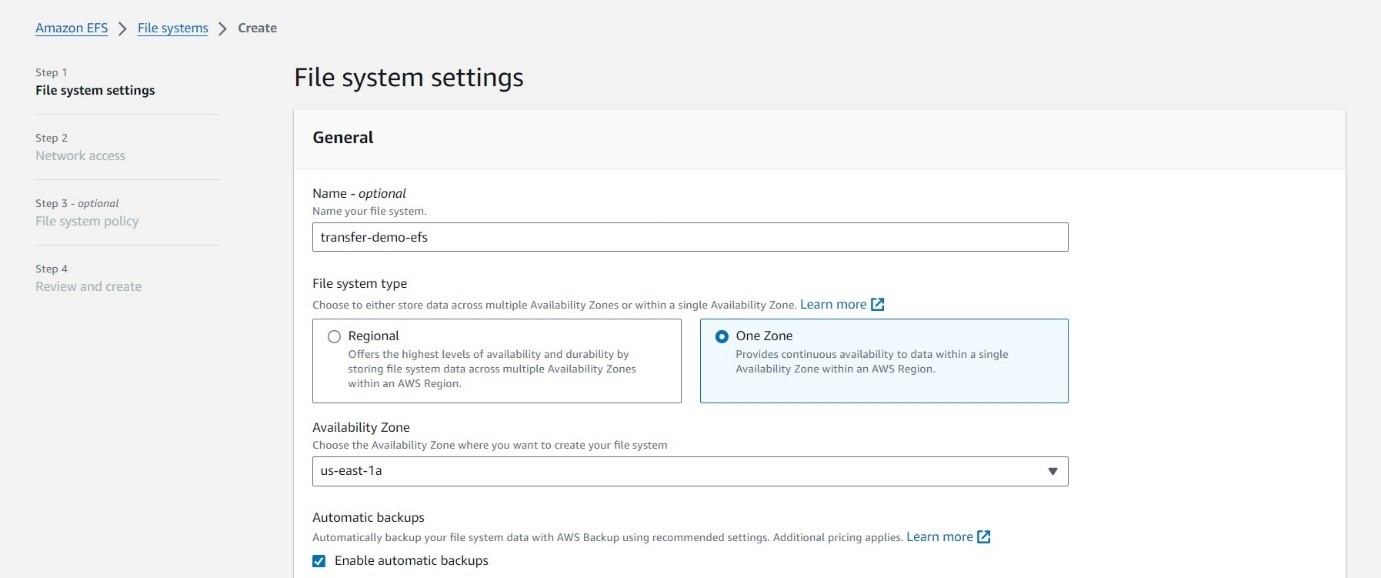
Keep the default setting in step 3 and hit create.
-
Configuring the Secure Gateway: AWS Transfer Server
Now, we'll create the heart of our system: the AWS Transfer Server configured for SFTP access. This server acts as the secure gateway for users to transfer files.
Keep the following points in mind while creating transfer server:
- Choosing the right server type: Public or VPC-hosted, depending on your security needs and network configuration.
- Public Server: This option is readily accessible from the internet, ideal for users outside your VPC (Virtual Private Cloud). However, it might not be suitable for highly sensitive data due to its public nature.
- VPC-Hosted Server: This server resides within your VPC, offering enhanced security as it's only accessible from within your trusted network. Choose this option if security is paramount for your files.
- Securing your endpoint: We'll define user access permissions and authentication methods, ensuring only authorized individuals can access your precious files.
- Mapping your storage: We'll connect your SFTP server to your designated Amazon S3 or EFS storage bucket, where your files will reside securely.
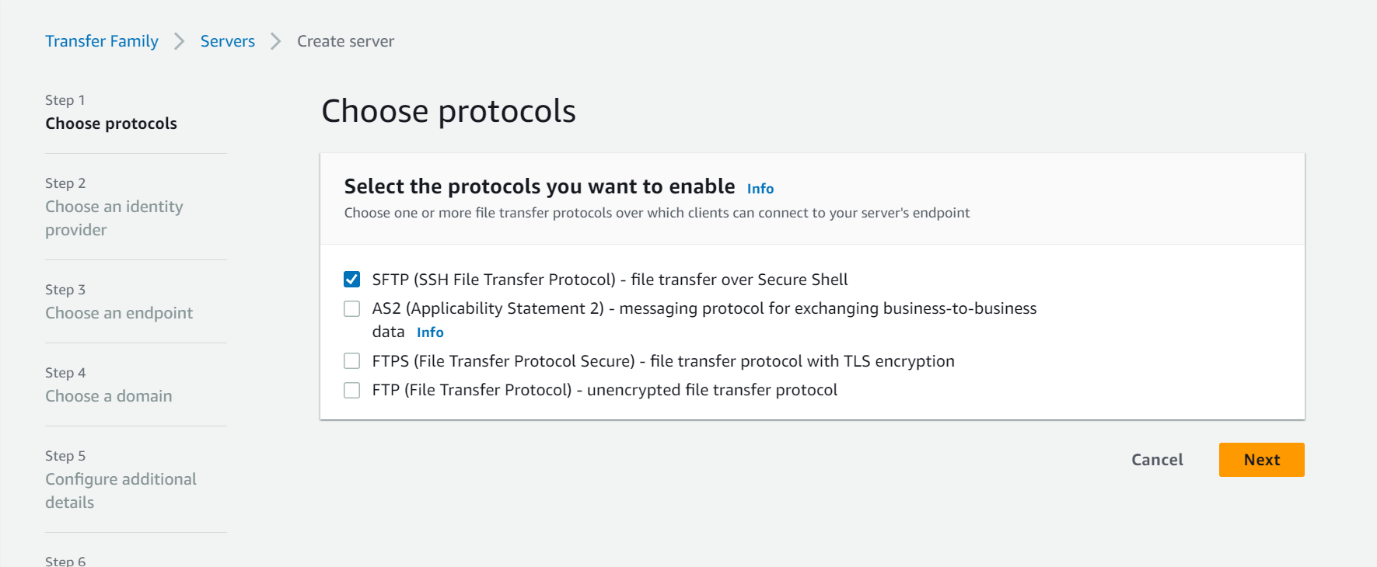
Create AWS Transfer Server configured for secure SFTP access following the below steps:
Navigate to Transfer Family on AWS Management Console and create a server which below configurations.
Creating the Server:
- Navigate to the Transfer Family section in the AWS Management Console.
- Click Create server.
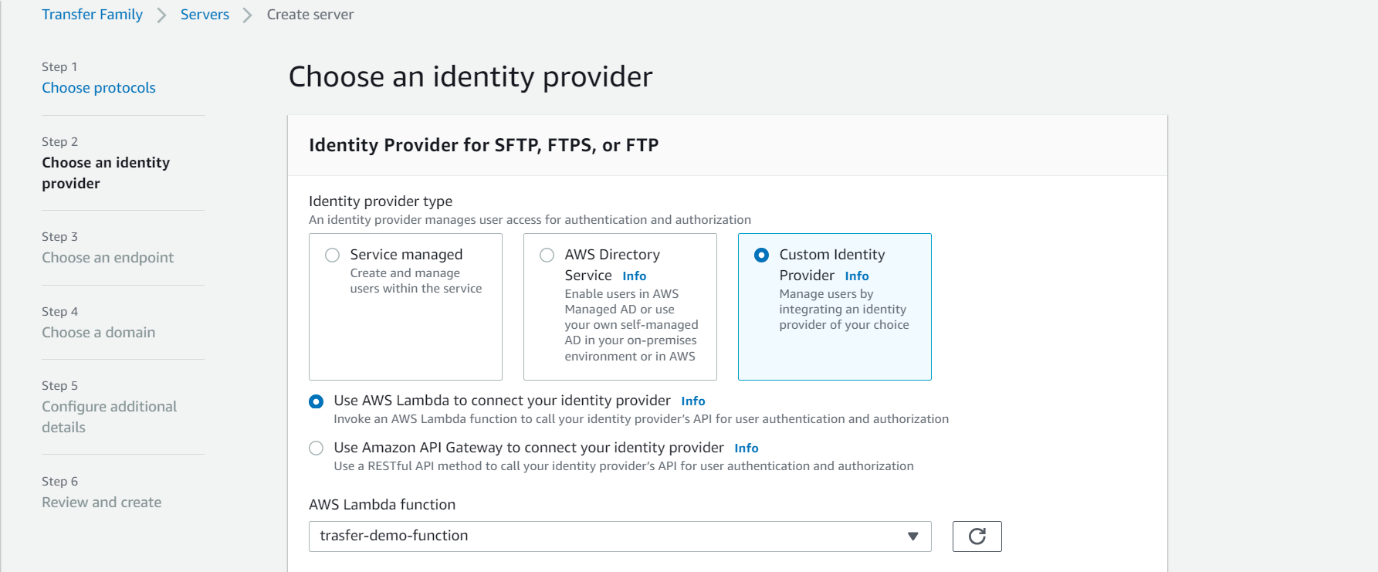
- Choose Custom Identity Provider and choose the lambda function we created in step 1.
- Choose the public endpoint type.

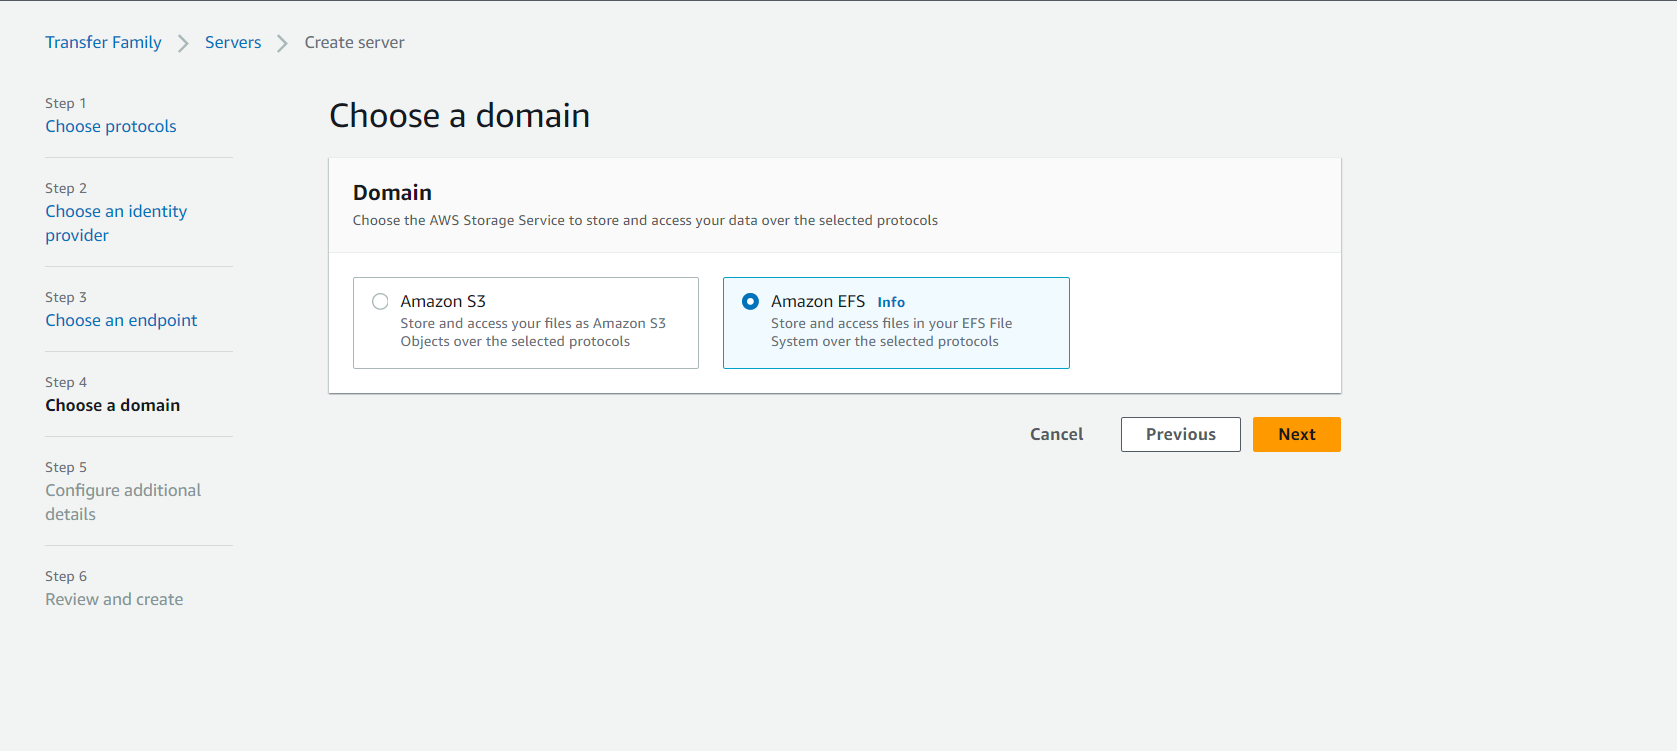
- When configuring storage, select your EFS file system from the available options.
Once everything is configured, review the details, and click Create to bring your secure SFTP server to life!
- Choosing the right server type: Public or VPC-hosted, depending on your security needs and network configuration.
-
Securing Credentials – Secrets Manager
We need an IAM role name it "transfer-demo-secret-role", that allows Secrets Manager to access the EFS file system. This role is crucial for the Lambda function to retrieve the secrets securely.
Assign the following IAM policy to the "transfer-demo-secret-role":
{"Version": "2012-10-17","Statement": [{"Sid": "Statement1","Effect": "Allow","Action": "elasticfilesystem:*","Resource": ["arn:aws:elasticfilesystem:us-east-1:<account-id>:file-system/<filesystem-id>"]}]}Replace <account-id> with your AWS account ID and <filesystem-id> with the ID of your EFS file system.
Storing the Secrets:
Now, it's time to store the actual secrets in Secrets Manager. These secrets will contain the credentials used for authentication and other user settings.
Create a secret with a name following this pattern:
aws/transfer/<transfer-server-id>/<directory-entrypoint>
Replace <transfer-server-id> with the ID of your Transfer Server and with the directory where the user will be accessing the files.
The JSON content for the secret should look like this:
{"Password":"mypassword","Role":"arn:aws:iam::587172484624:role/transfer-demo-secret-role","PosixProfile":"{\"Uid\": 1001, \"Gid\": 1001}","HomeDirectoryDetails":"[{\"Entry\": \"/sakshi\", \"Target\": \"/fs0e70962c7438494a9/sakshi\"}]"}- Password: Replace "mypassword" with your actual password.
- Role: This specifies the IAM role ("transfer-demo-secret-role") that the Lambda function assumes to access the EFS file system.
- PosixProfile: This defines the user's Unix user ID (UID) and group ID (GID) within the EFS file system.
- HomeDirectoryDetails: This defines the user's home directory within the EFS file system, mapping the "/sakshi" directory on the server to the "/fs-0e70962c7438494a9/sakshi" directory within the EFS.
-
Test SFTP server
Congratulations! You've built the foundation for secure file transfer. Now, let's test the SFTP server and see if everything works as expected.
Test the access in the home directory for a particular user using below command:

Conclusion
In conclusion, the seamless integration of AWS Transfer Family, Lambda functions, Secrets Manager, and EFS offers a potent solution for secure and efficient file transfers. By adopting Lambda as a custom identity provider and leveraging Secrets Manager for secure credential storage, businesses can fortify their data transfer mechanisms against potential threats. The persistent storage capabilities of EFS, coupled with the careful configuration of the AWS Transfer Server, ensure a robust and tailored security environment. For instance, a use case could involve a financial institution securely transferring sensitive transaction files between branches, ensuring credentials are accessed securely.
