
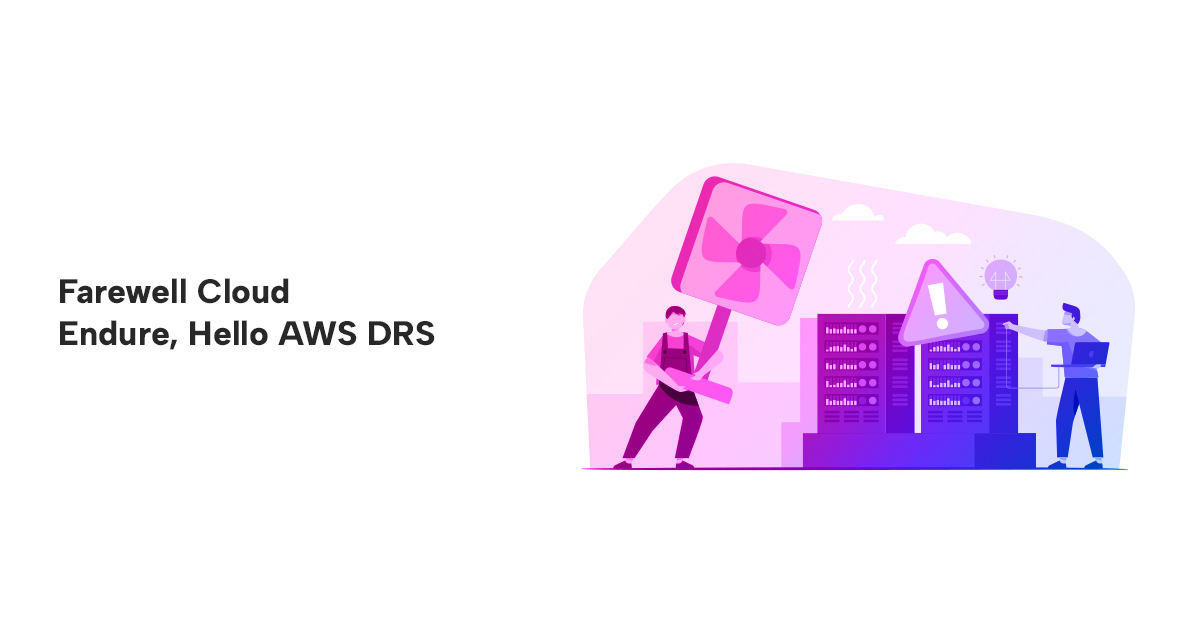
Farewell Cloud Endure, Hello AWS DRS
By Khushi Carpenter, Piyush Jalan / Jan 17, 2024
Table of Contents
- Prerequisites
- Bridging the Gap in Three Steps
- A. Assessment Phase
- B. Start Upgrade Phase
- C. Finalize Upgrade Phase
- Conclusion
The clock is ticking! Cloud Endure's retirement date nears, leaving businesses scrambling for a seamless transition to AWS Disaster Recovery Service (DRS). The blog will provide a comprehensive guide, walking through the step-by-step process of upgrading Cloud Endure disaster recovery to AWS Disaster Recovery Service (DRS) using the upgradation tool along with key troubleshooting points.
- Initialize DRS: Ensure that AWS Disaster Recovery Service (DRS) is properly initialized before proceeding with the upgrade.
- Generate API Token in CloudEndure Console: Create an API token from the Setup & Info page dedicated to the project within the CloudEndure Console.
- Verify Role Permissions: Confirm that the role linked with the Cloud Endure blueprint possesses the AWS managed policy named ‘AWSElasticDisasterRecoveryRecoveryInstancePolicy’. This ensures the seamless execution of the upgrade process.
- The Assessment Tool is compatible with both Linux and Windows machines but must have internet access.
- Check and verify this network requirements for smooth replication.
- Assessment Phase: Evaluate the eligibility of servers for the transition to AWS Disaster Recovery Service (DRS) utilizing the automation tool.
- Start Upgrade Phase: During this phase, the server is initially upgraded to AWS DRS using a test snapshot while CloudEndure is active. This allows any potential issues to be identified and resolved before the final upgrade.
- Finalize Upgrade Phase: Complete the full transition to AWS DRS, finalizing the upgrade process.
The assessment phase includes the download and execution of an assessment tool, producing a CSV file containing warnings as output. This tool operates at the project level, conducting assessments for CloudEndure project and providing results for all servers associated with the CloudEndure project. Follow the below steps to carry out assessment on Linux or Windows server.
- Download the Assessment Tool using the following command:
wget https://cedr-to-drs-upgrade-tool.cloudendure.com/latest/cloudendure_to_drs_upgrade_assessment_tool - Change the permissions using the following command:
sudo chmod +x cloudendure_to_drs_upgrade_assessment_tool - Run the following command with above variables
sudo ./cloudendure_to_drs_upgrade_assessment_tool –api-token [api_token] --project-id [12345xx-0000-0000-0000-00aa00ab00b0]
or use below command which uses username and passwordsudo ./cloudendure_to_drs_upgrade_assessment_tool --username [[email protected]] --password [my_secret_password] --project-id [12345xx-0000-0000-0000-00aa00ab00b0]
- Download the Assessment Tool from following URL:
https://cedr-to-drs-upgrade-tool.cloudendure.com/latest/cloudendure_to_drs_upgrade_assessment_tool.exe - Run the following command in Power Shell with the variables
.\cloudendure_to_drs_upgrade_assessment_tool –api-token [api_token] --project-id [12345xx-0000-0000-0000-00aa00ab00b0]
or use below command which uses username and password.\cloudendure_to_drs_upgrade_assessment_tool --username [[email protected]] --password [my_secret_password] --project-id [12345xx-0000-0000-0000-00aa00ab00b0]Once the assessment is complete (which usually takes 8-10 mins), the Assessment Tool will display the assessment results, including which machines are:
- Eligible for DRS upgrade as-is
- Eligible but have warnings that must be addressed
- Ineligible for upgrade
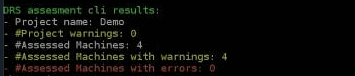
The Assessment Tool will create a folder in the same directory where the tool was installed called ‘output’ and a CSV that lists all the warnings, errors, and mitigations will be stored.
Here are some common warnings and their descriptions for troubleshooting that you may encounter:
- CreatingNewSubnetUnsupported: This warning arises if the Subnet settings in the CEDR blueprint are configured to "Create New." To resolve, either select an existing subnet in the Blueprint settings or leave it unchanged, and the launch template in DRS will not be associated with a Subnet.
- CreatingNewSecurityGroupsUnsupported: This warning occurs when the Security Group settings in the CEDR blueprint are set to "Create New." To address this, choose an existing Security Group in the Blueprint settings or leave it as is to ensure that the launch template in DRS does not have an associated Security Group.
- CustomConverterTypeUnsupported: This warning is triggered if a specific converter instance type is selected in the replication settings. opt for the default instance type to resolve this warning.
- IAMRolesRequireRecoveryInstancePermissions: This warning appears if an IAM Instance Profile is defined in the Blueprint. To support failback, ensure that all recovery instances have the AWSElasticDisasterRecoveryRecoveryInstancePolicy policy attached to the instance profile role.
- MachineSettingsNotSupported: This warning requires careful consideration, and resolution may involve seeking assistance from AWS Support.
Except for the machine settings warning, all the above-mentioned warnings can be ignored.
During this phase, the server upgrade tool will deploy the DRS Agent, facilitating the transfer of a snapshot to AWS DRS. This allows for comprehensive testing, including connectivity tests and assessing application performance. If the Disaster Recovery (DR) tests do not pass, Cloud Endure remains active, ensuring there is no downtime in case of a disaster. It's crucial to be aware that charges will apply for both Cloud Endure and DRS during this period.
Follow the below steps to carry out Start Upgrade Phase on Linux or Windows server.
- Download the Upgrade Tool using the following command:
wget https://cedr-to-drs-upgrade-tool.cloudendure.com/latest/cloudendure_to_drs_upgrade_tool - Change the permissions using the following command:
sudo chmod +x cloudendure_to_drs_upgrade_tool - Run the following command with above variables
sudo ./cloudendure_to_drs_upgrade_tool start-upgrade --api-token [api_token] --project-id [project-id] --aws-access-key-id [access_key] –aws-secret-access-key [secret_key] –aws-session-token [session_token] --import-replication-configuration --import-blueprint --import-test-snapshot --ignore-validation-warnings
or use below command which uses username and passwordsudo ./cloudendure_to_drs_upgrade_tool start-upgrade --username [[email protected]] --password [my_secret_password] --project-id [project-id] --aws-access-key-id [access_key] –aws-secret-access-key [secret_key] –aws-session-token [session_token] --import-replication-configuration --import-blueprint --import-test-snapshot --ignore-validation-warnings
- Download the Upgrade Tool using the following command:
https://cedr-to-drs-upgrade-tool.cloudendure.com/latest/cloudendure_to_drs_upgrade_tool - Run the following command on PowerShell with above variables
.\cloudendure_to_drs_upgrade_tool start-upgrade --api-token [api_token] --project-id [project-id] --aws-access-key-id [access_key] –aws-secret-access-key [secret_key] –aws-session-token [session_token] --import-replication-configuration --import-blueprint --import-test-snapshot --ignore-validation-warnings
or use below command which uses username and password.\cloudendure_to_drs_upgrade_tool start-upgrade --username [[email protected]] --password [my_secret_password] --project-id [project-id] --aws-access-key-id [access_key] –aws-secret-access-key [secret_key] –aws-session-token [session_token] --import-replication-configuration --import-blueprint --import-test-snapshot --ignore-validation-warningsIf at this point there is a situation of disaster, the recovery instance could be initiated using Cloud Endure from retained snapshots, but all new snapshots will be taken in DRS. The RPO will be less than 24 hours for this scenario.
After completing the installation, the machine will be added to DRS on the Source servers page with a ‘lag’ because only one snapshot is replicated. The lag will disappear once we successfully complete the finalize upgrade phase.
When the status changes to ‘Ready’ initiate the drill and select the most recent data and initiate a drill.
The launched Drill instance on the ‘Recovery instances’ page in DRS. Test the server's connectivity and make sure it works as required. If there are any issues, review your settings, change the blueprint, and perform the necessary troubleshooting steps. Once the tests are completed successfully, move on to the finalize-upgrade step.
For “libz.so.1: failed to map segment from shared object: Operation not permitted” error:
- The error can be solved by remounting /tmp with exec permission and changing it back to noexec as it is a security best practice.
sudo mount -o remount,exec /tmpsudo mount -o remount,noexec /tmp
In this stage, the server upgrade tool will activate the DRS Agent while uninstalling the Cloud Endure Agent. This transition ensures the seamless shift from Cloud Endure to the upgraded Disaster Recovery Service (DRS) configuration.
To proceed with this stage, follow the steps outlined below.
- Run the following command variables
sudo ./cloudendure_to_drs_upgrade_tool finalize-upgrade --api-token [api_token] --project-id [project-id] --aws-access-key-id [access_key] –aws-secret-access-key [secret_key] –aws-session-token [session_token] --import-replication-configuration --import-blueprint --import-test-snapshot --ignore-validation-warnings
or use below command which uses username and passwordsudo ./cloudendure_to_drs_upgrade_tool finalize-upgrade --username [[email protected]] --password [my_secret_password] --project-id [project-id] --aws-access-key-id [access_key] –aws-secret-access-key [secret_key] –aws-session-token [session_token] --import-replication-configuration --import-blueprint --import-test-snapshot --ignore-validation-warnings
- Run the following command on PowerShell with above variables
.\cloudendure_to_drs_upgrade_tool finalize-upgrade --api-token [api_token] --project-id [project-id] --aws-access-key-id [access_key] –aws-secret-access-key [secret_key] –aws-session-token [session_token] --import-replication-configuration --import-blueprint --import-test-snapshot --ignore-validation-warnings
or use below command which uses username and password.\cloudendure_to_drs_upgrade_tool finalize-upgrade --username [[email protected]] --password [my_secret_password] --project-id [project-id] --aws-access-key-id [access_key] –aws-secret-access-key [secret_key] –aws-session-token [session_token] --import-replication-configuration --import-blueprint --import-test-snapshot --ignore-validation-warningsUpon executing the provided commands, DRS will initiate a server rescan, replicating all identified disks. The duration of this process may vary, ranging from 4 to 24 hours, contingent on the size of the respective servers.
After the completion of the rescanning process, the server will be in a healthy state and available for use.
The journey doesn't end here – the blog has paved the way for ongoing resilience and continuous improvement. With the servers now in a healthy state, you are well-prepared to navigate the evolving landscape of disaster recovery in the AWS cloud environment. Embrace the enhanced capabilities of AWS DRS, ensuring your business stays robust and resilient in the face of potential disruptions. Cheers to a seamless migration and a future-ready disaster recovery strategy!
