
Switching AWS IAM Identity Center Identity Source to Azure AD
By Mufaddal Suratwala / Jul 11, 2023
Table of Contents
- Introduction
- What is AWS IAM Identity Center?
- IAM vs IAM Identity Center:
- What is an Identity source?
- Overview of steps:
- User Provisioning
- Matching of users
- User Selection
- Things to take care of:
- References
Introduction
In today’s fast-paced world where identities have moved from paper to digital signatures, management of identities and passwords has become paramount but cumbersome at the same time. Access to multiple applications has become an essential part of our daily workflows, and management of the credentials, a huge challenge. To help solve these identity management challenges IT professionals came up with a unique concept called Single Sign On(SSO) to allow users to sign in to multiple applications with a single authentication mechanism.
What is AWS IAM Identity Center?
AWS IAM Identity Center (successor to AWS Single Sign-On) is a single sign-on service that helps you manage the identities of your workforce users and centrally manage their access across multiple AWS Accounts and Applications. It helps you manage multi-account permissions and access to IAM Identity Center Managed Applications.
IAM vs IAM Identity Center:
IAM and IAM Identity Center might sound the same, but they are extremely different services with unique use cases. The key differences between them are:
- Account Access: IAM is primarily used to manage access to a single AWS account. IAM Identity Center is used to manage access to multiple AWS accounts and applications.
- Cross-Account Permissions and Roles: For AWS IAM, you need to log into each account and create separate roles for each account, or create a policy that allows roles to be assumed for cross-account access. However, using IAM Identity Center you can reuse existing IAM policies and permission sets and apply them to multiple users and groups for ease of cross-account access.
- Credential Expiry: IAM grants long-term credentials to users which hamper your security posture in case the credentials are compromised. To solve this issue, IAM Identity Center grants you temporary credentials to combat this risk and protect your accounts even more effectively.
- Identity Management: IAM identities are managed by AWS. IAM Identity Center identities are managed by the Identity Provider of the SSO.
What is an Identity source?
Identity source is like a directory which defines where your users and groups are managed. You can choose between 3 options as your identity source:
- IAM Identity Center Directory: This is the default directory that is chosen when you enable IAM Identity Center for the first time. If you don’t change your identity source this is where you would be creating your users and groups.
- Active Directory: If you wish to manage your users and groups in either your AWS Managed Microsoft AD directory using AWS Directory Service or your self-managed directory in Active Directory (AD) choose this option.
- External Identity Provider: If you wish to manage your users using an external identity provider like Okta or Azure Active Directory this is the right option for you.
What are the benefits of changing your Identity Source to your Identity Provider?
- Reduction in administrative overhead: External IDPs can handle many tasks normally handled by SSO like user provisioning, password management, and MFA. This can help reduce overhead pertaining to identities and access permissions.
- Improved security: External IDPs offer higher levels of security as compared to the default identity source as they have much more experience and resources dedicated to security.
- Improved efficiency: If you use external IDPs to log into your AWS IAM Identity Center, it can help reduce the risk of password reuse and improve productivity.
- Integration with existing Identity Systems: If you already have an existing identity base in your system then adding it as a directory source to AWS IAM Identity Center allows you to use your existing user base, roles, and permissions.
- Scalability and Availability: Overall IDPs are designed to scale as per requirements for user authentication and authorization. So, you can offload these responsibilities to the IDP and focus on other parts of your environment.
- Azure AD
- CyberArk
- Google Workspace
- JumpCloud
- Okta
- OneLogin
- Ping Identity
Overview of steps:
This is the overview of steps needed to integrate Azure AD with IAM Identity Centre:
- Download metadata from AWS SSO and save it on your local machine.
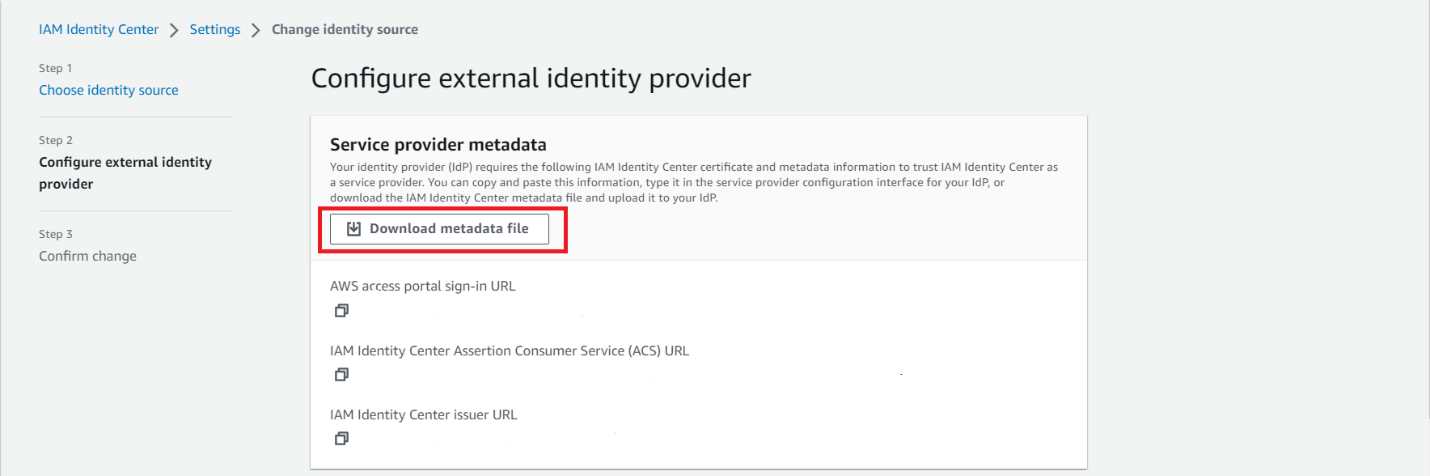
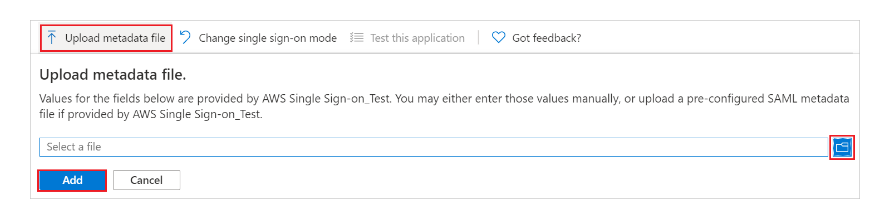
- Configure IAM Identity Center as a SaaS application in Azure AD. Go to the Application section and click on the Single Sign On Tab. Click on upload metadata and upload the metadata you downloaded from AWS.
- Download federation metadata xml file/Certificate(Base64) from Azure.
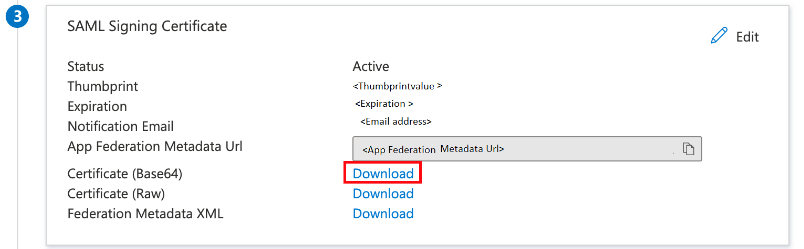
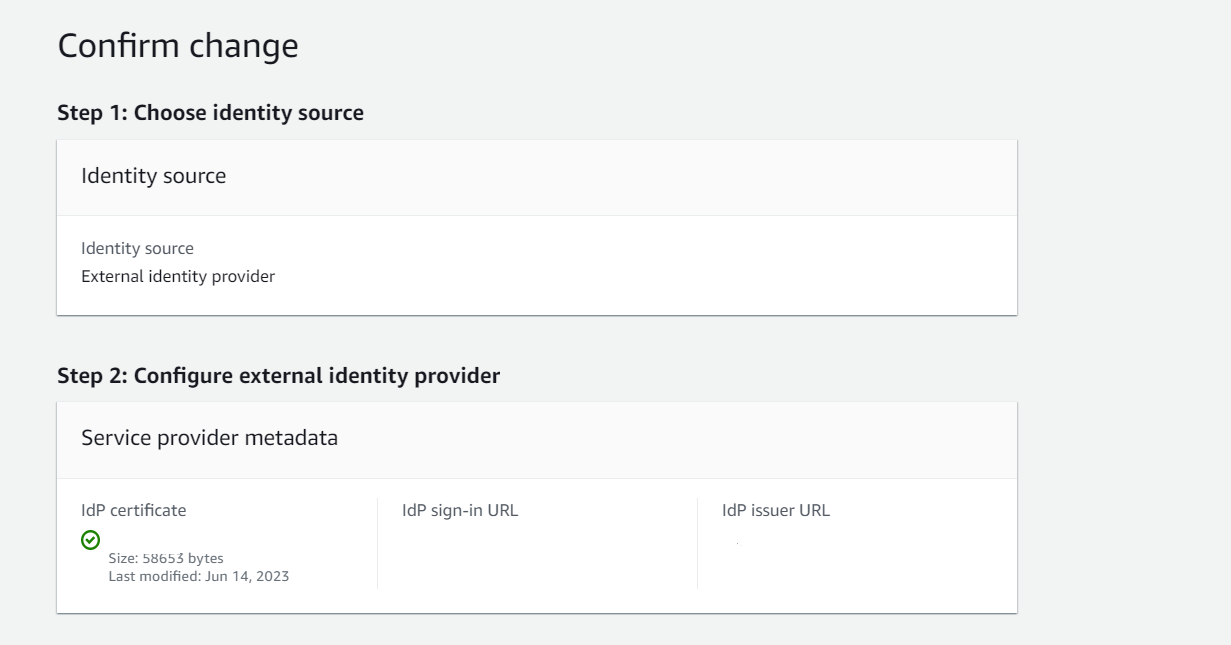
- Upload it on AWS. This will help you successfully build a trust relationship.
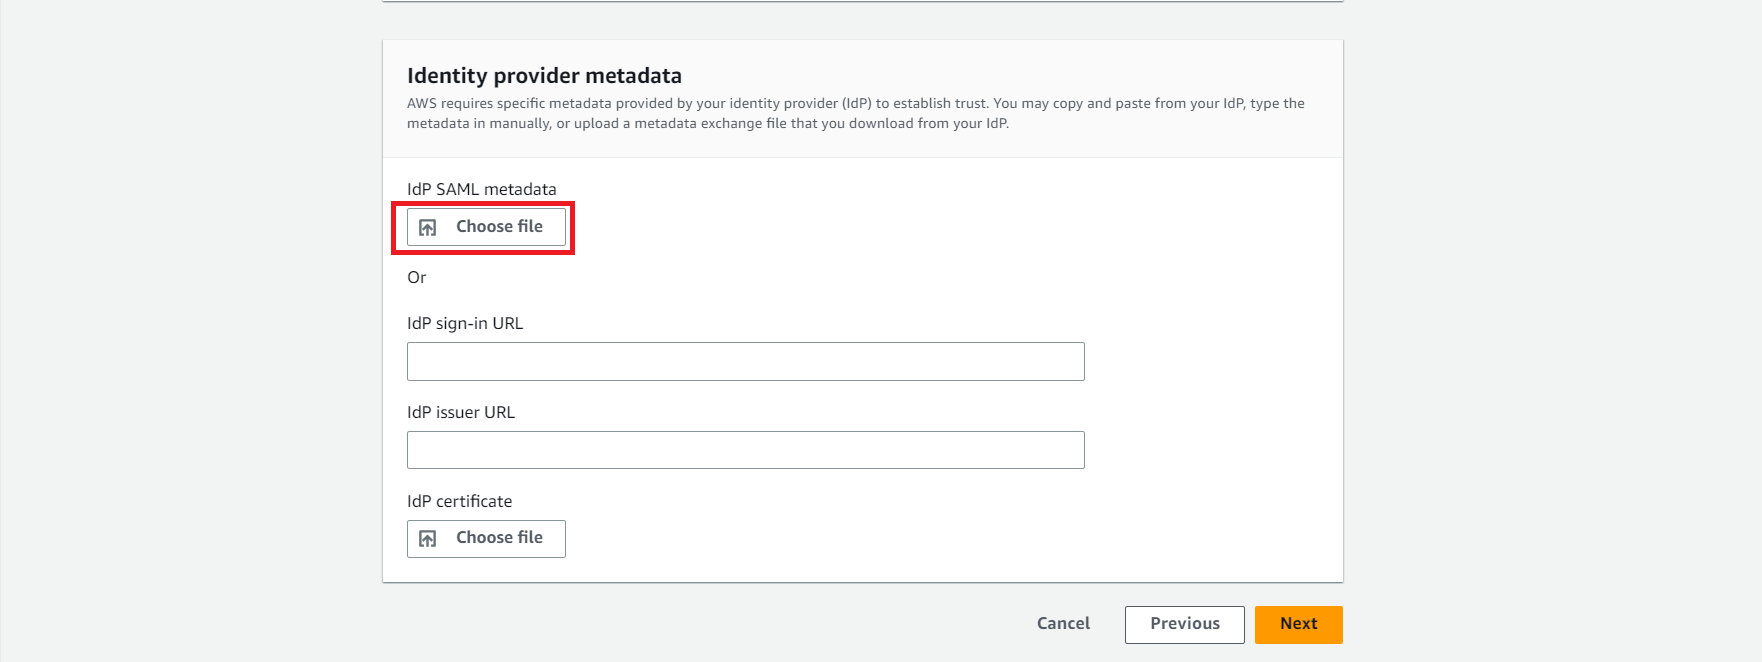
- Review the settings on AWS. Carefully read the conditions and type ACCEPT.

Only the users you select will be added to the application. Once the integration is done you cannot add new users directly from SSO. Your existing users and permissions will not be affected. However, even the old users must be re-provisioned directly from Azure AD so that their authentication can be done through the AD.
User Provisioning
Azure AD application-provisioning does the job of automatic creation of user identities and roles in the applications that users need access to. Additionally, it also takes care of the maintenance and removal of user identities as status or roles change.
Matching of users
There can be 2 situations in which the provisioning is done:
- Greenfield Deployment: It refers to provisioning users and groups in a target system that does not have existing users.
- Brownfield Deployment: It refers to provisioning users and groups in a target system that consists of existing users.
This can help solve the problem of duplication in target systems and supports authentication of existing users with their existing roles and permissions. In systems where hundreds of users exist with permissions to multiple accounts, matching helps avoid downtime and smooth switch over. Generally, user principal name from Azure and username from AWS IAM Identity Center are chosen as matching attributes.
In case if you feel that the above-mentioned attributes are not matching you can choose new attributes or modify them using expressions by changing the mapping type to expressions. You can also match users using multiple attributes by changing the “Match objects using this attribute” to yes. 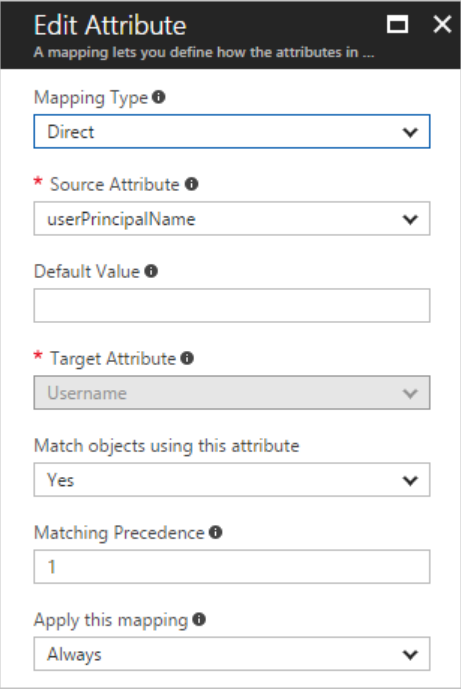
User Selection
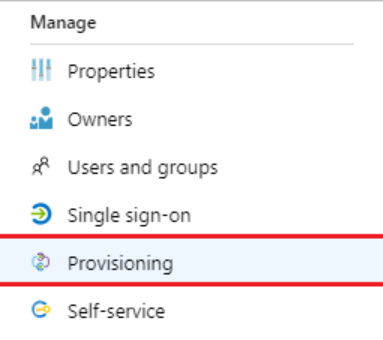
- Go to Users and Groups in IAM Identity Center Application in Azure AD and select Users and Groups in the Manage section.
- Select the users you wish to provision and click on the select button at the bottom and then click on assign. This allows to fine grain and select which users you wish to provision to IAM Identity Center.
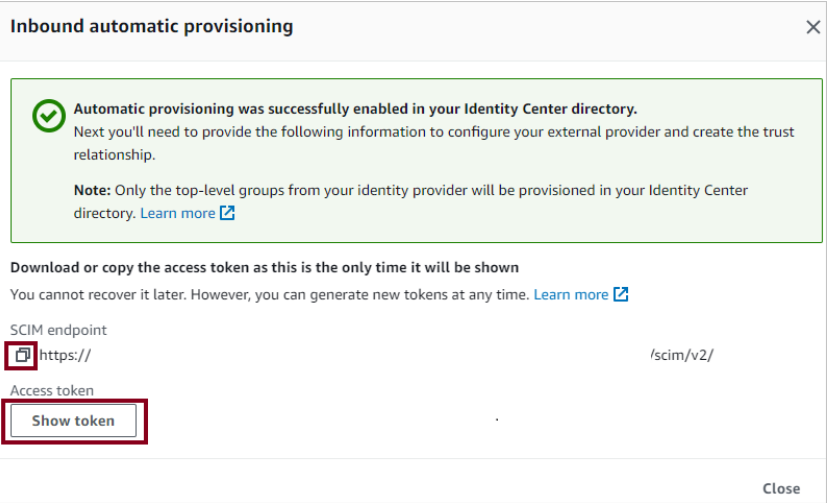
- Go back to AWS IAM Identity Center. Enable automatic provisioning in AWS IAM Identity Center.

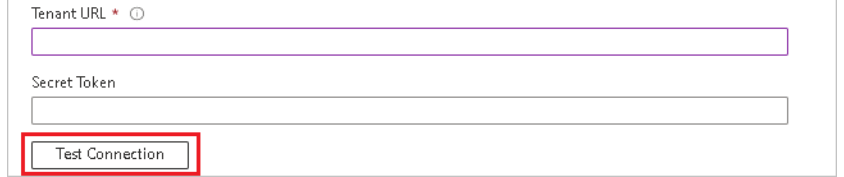
- From the Inbound Automatic provisioning dialog box, copy and save SCIM endpoint(as it will change each time you reopen the dialog box). You will enter these values in the tenant URL and secret token field in Azure.
- Go to IAM Identity Center Application in Azure and click on provisioning.
- Select automatic provisioning mode and add the Tenant URL and secret token you retrieved earlier from AWS in the respective fields.
- In the notification field, add the E-mail addresses of the user or group who should be notified in case the provisioning fails. Don’t forget to click on the Send an email notification when a failure occurs dialog box.

- Select save and under the mappings section, click on Synchronize Azure Active Directory Users to AWS IAM Identity Center. Review the attributes that are being synchronized. (Note: The attributes selected as Matching properties will be used to uniquely identify the users in both the systems)
- Similarly, under mappings section click on “Synchronize Azure Active Directory Groups to AWS IAM Identity Center”. Review the attributes given and click on Save.
- To enable provisioning, turn the Provisioning Status button On from the Settings section.

- In the scope section select Sync only assigned users and groups to provision a selected group of users only.

- Click on Save to start the provisioning.
Things to take care of:
- Once the integration is complete, do not push all the users at once. Roll out a few users and see how the system responds.
- Make sure the matching attributes have the same values, or else you will face the problem of redundant values. Try using expressions to make the values the same as per your system requirements.
- After the integration, your existing permissions and users will exist as they are, in AWS IAM Identity Center. However, since all the authentication now happens through Azure AD, your users need to be provisioned from Azure AD to IAM Identity Center before they can successfully log in again. In the case of Brownfield deployments, ensure that you inform all the existing IAM Identity Center Users about the change and prepare them for possible downtime in advance.
- Moreover, your existing MFA devices activated in AWS IAM Identity Center will also be disabled. So, make sure you enable MFA in Azure AD for all of your users.
- SCIM data must also be updated every year to continue automatic provisioning.
References
- AWS Documentation: Connect to an external identity provider - AWS IAM Identity Center (successor to AWS Single Sign-On) (amazon.com)
- Azure AD integration with AWS IAM Identity Center(Microsoft): Tutorial: Azure AD SSO integration with AWS IAM Identity Center (successor to AWS Single Sign-On) - Microsoft Entra | Microsoft Learn
- Automatic Provisioning using Azure AD: Tutorial: Configure AWS IAM Identity Center(successor to AWS single sign-On) for automatic user provisioning with Azure Active Directory - Microsoft Entra | Microsoft Learn
